
Tekmatix Help Articles
Love your help
Use the search bar below to find help guides and articles for using Tekmatix
Use the search bar below to look for help articles you need.
How To Customize Your Course Experience Using the New Theme Customizer in Tekmatix
How To Customize Your Course Experience Using the New Theme Customizer in Tekmatix
Creating an engaging and branded learning environment just got easier! With Tekmatix’s New Theme Customizer, you can tailor your course layout—from logo to sidebars—without writing a single line of code. Whether you're designing a sales course, wellness workshop, or client onboarding program, this tool gives you full visual control.
In this guide, we’ll walk you through how to use the Theme Customizer, key elements you can change, and a real-world example to help you make the most of it.
Why This Matters
A branded course site doesn’t just look good—it builds trust, improves user retention, and boosts course engagement. Tekmatix’s Theme Customizer allows you to deliver a professional experience without relying on developers or designers.
Step-by-Step: How To Use the Theme Customizer
Step 1: Access the Customizer
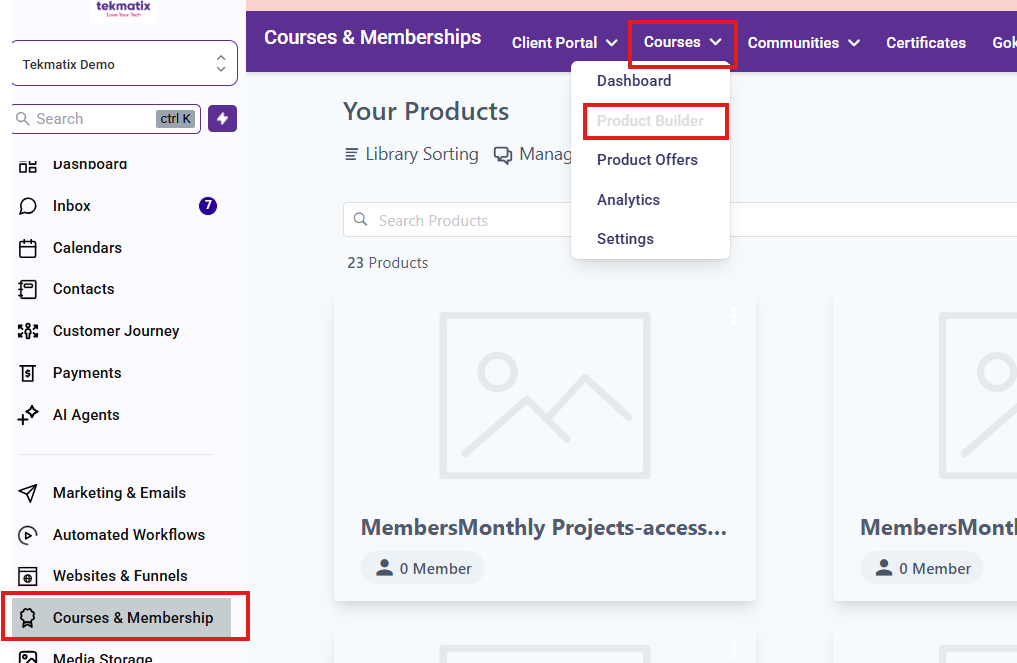
Go to your Courses & Memberships > Courses > Product Builder > Select Course.
Click Edit and go to Course Outline.
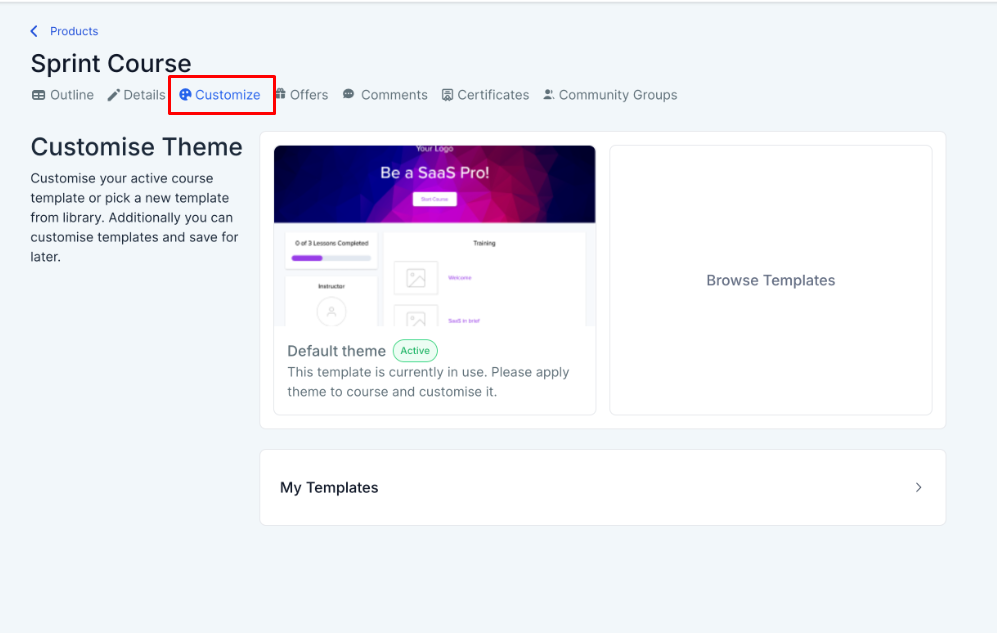
Click the "Customize" button.
Select "Browse System Templates" and choose the Neo Classic Theme to unlock the new customization features.
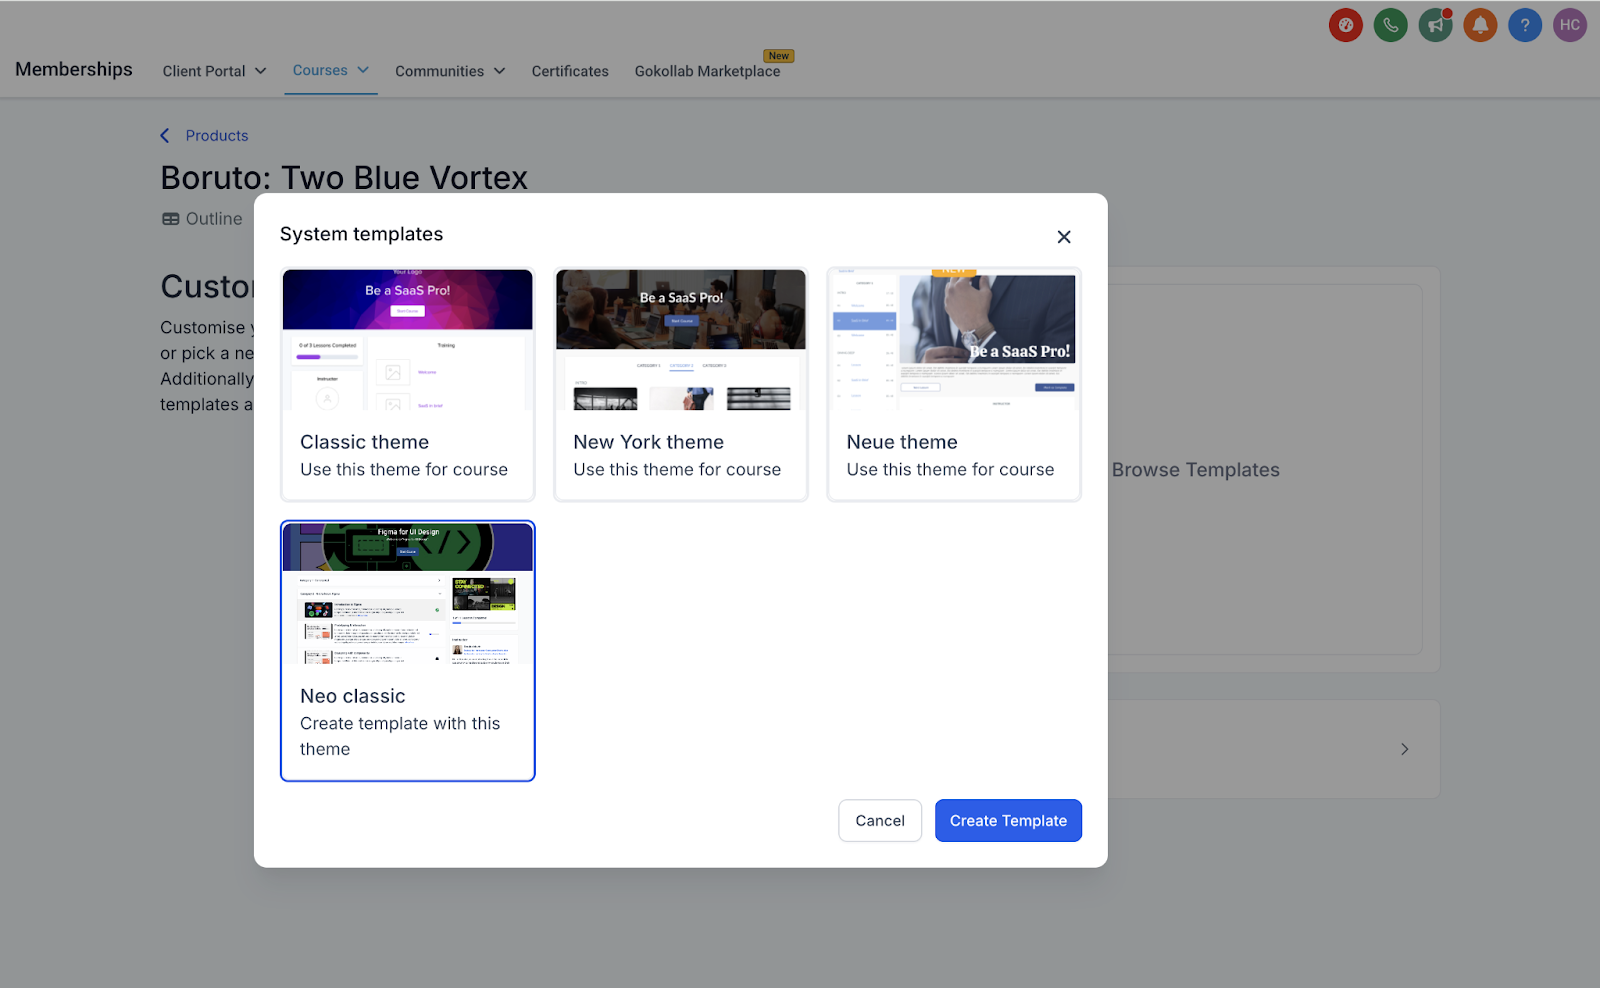
Step 2: Modify Your Theme
Once the Neo Classic theme is selected, you're ready to personalize:
You can modify design elements, preview in real-time, and save the theme for future use under the "My Templates" tab.
Key Areas You Can Customize
1. Logo (Required)
Show or hide it.
Choose between text or image logos.
Set click action (e.g., redirect to Course Home or Product Page).
Choose logo height (Small or Medium).
Place it in the top-left or center of the header.
2. Search Bar
Toggle visibility.
Add helper text (e.g., “Search for modules or topics”).
Change background or text color.
3. Hero Section (Required)
Set a solid color or background image.
Customize overlay effects (color and opacity).
Edit course title and description (font, size, alignment).
Choose layout spacing: Full, Medium, or Small height.
Personalize CTA button (color, label, alignment).
4. Welcome Body (Add Sections)
Add custom blocks with:
Images (with clickable links)
Videos
Text with formatting
CTA buttons (custom color, text, link)
5. Course Syllabus (Required)
Choose display style: by Category or as Posts.
Customize section labels (e.g., “Coming Soon,” “Show More”).
6. Course Sidebar
Show/hide Progress Bar (plus color and label options).
Instructor Section: Add headshot, name, title, and bio.
Cross-Sell Offers: Promote additional offers directly from the course.
Custom Sidebar Blocks: Insert promo banners, announcements, or CTAs.
Additional Customization Options
Lesson Page
Breadcrumb trail to help users navigate.
Customize background color.
Enable or disable auto-advance.
Adjust text alignment and completion button style.
Category Page
Toggle sidebar progress indicators.
Customize tooltip labels for better UX.
Sample Scenario: Customizing a Sales Training Course
Case:
Let’s say you're creating a Sales Mastery Course for new hires.
Use the Neo Classic theme and upload your company logo.
Enable the search bar with helper text like “Search for sales topics.”
In the Hero Section, add a motivational banner image with a CTA button saying “Start Learning Now.”
Add a Welcome Video block to introduce the course.
In the Sidebar, display the instructor’s photo and a Cross-Sell Block promoting your “Advanced Sales Techniques” course.
Create a progress bar with custom colors matching your brand.
This setup ensures new employees feel welcomed, guided, and exposed to further learning opportunities—all from one place.
Pro Tips
Use consistent colors that match your brand.
Preview changes before saving to avoid design clashes.
Save reusable layouts as templates for future use.
Use CTAs wisely to guide learners through your funnel.
Final Thoughts
The New Theme Customizer in Tekmatix empowers you to transform your course into a branded, user-friendly experience—without hiring a developer. From custom banners to CTA buttons, you’re in full control.
Now’s the perfect time to revisit your course design and give it the refresh it deserves!

Latest Blog Posts
How To Customize Your Course Experience Using the New Theme Customizer in Tekmatix
How To Customize Your Course Experience Using the New Theme Customizer in Tekmatix
Creating an engaging and branded learning environment just got easier! With Tekmatix’s New Theme Customizer, you can tailor your course layout—from logo to sidebars—without writing a single line of code. Whether you're designing a sales course, wellness workshop, or client onboarding program, this tool gives you full visual control.
In this guide, we’ll walk you through how to use the Theme Customizer, key elements you can change, and a real-world example to help you make the most of it.
Why This Matters
A branded course site doesn’t just look good—it builds trust, improves user retention, and boosts course engagement. Tekmatix’s Theme Customizer allows you to deliver a professional experience without relying on developers or designers.
Step-by-Step: How To Use the Theme Customizer
Step 1: Access the Customizer
Go to your Courses & Memberships > Courses > Product Builder > Select Course.
Click Edit and go to Course Outline.
Click the "Customize" button.
Select "Browse System Templates" and choose the Neo Classic Theme to unlock the new customization features.
Step 2: Modify Your Theme
Once the Neo Classic theme is selected, you're ready to personalize:
You can modify design elements, preview in real-time, and save the theme for future use under the "My Templates" tab.
Key Areas You Can Customize
1. Logo (Required)
Show or hide it.
Choose between text or image logos.
Set click action (e.g., redirect to Course Home or Product Page).
Choose logo height (Small or Medium).
Place it in the top-left or center of the header.
2. Search Bar
Toggle visibility.
Add helper text (e.g., “Search for modules or topics”).
Change background or text color.
3. Hero Section (Required)
Set a solid color or background image.
Customize overlay effects (color and opacity).
Edit course title and description (font, size, alignment).
Choose layout spacing: Full, Medium, or Small height.
Personalize CTA button (color, label, alignment).
4. Welcome Body (Add Sections)
Add custom blocks with:
Images (with clickable links)
Videos
Text with formatting
CTA buttons (custom color, text, link)
5. Course Syllabus (Required)
Choose display style: by Category or as Posts.
Customize section labels (e.g., “Coming Soon,” “Show More”).
6. Course Sidebar
Show/hide Progress Bar (plus color and label options).
Instructor Section: Add headshot, name, title, and bio.
Cross-Sell Offers: Promote additional offers directly from the course.
Custom Sidebar Blocks: Insert promo banners, announcements, or CTAs.
Additional Customization Options
Lesson Page
Breadcrumb trail to help users navigate.
Customize background color.
Enable or disable auto-advance.
Adjust text alignment and completion button style.
Category Page
Toggle sidebar progress indicators.
Customize tooltip labels for better UX.
Sample Scenario: Customizing a Sales Training Course
Case:
Let’s say you're creating a Sales Mastery Course for new hires.
Use the Neo Classic theme and upload your company logo.
Enable the search bar with helper text like “Search for sales topics.”
In the Hero Section, add a motivational banner image with a CTA button saying “Start Learning Now.”
Add a Welcome Video block to introduce the course.
In the Sidebar, display the instructor’s photo and a Cross-Sell Block promoting your “Advanced Sales Techniques” course.
Create a progress bar with custom colors matching your brand.
This setup ensures new employees feel welcomed, guided, and exposed to further learning opportunities—all from one place.
Pro Tips
Use consistent colors that match your brand.
Preview changes before saving to avoid design clashes.
Save reusable layouts as templates for future use.
Use CTAs wisely to guide learners through your funnel.
Final Thoughts
The New Theme Customizer in Tekmatix empowers you to transform your course into a branded, user-friendly experience—without hiring a developer. From custom banners to CTA buttons, you’re in full control.
Now’s the perfect time to revisit your course design and give it the refresh it deserves!
Marketing
How To Customize Your Course Experience Using the New Theme Customizer in Tekmatix
How To Customize Your Course Experience Using the New Theme Customizer in Tekmatix
Creating an engaging and branded learning environment just got easier! With Tekmatix’s New Theme Customizer, you can tailor your course layout—from logo to sidebars—without writing a single line of code. Whether you're designing a sales course, wellness workshop, or client onboarding program, this tool gives you full visual control.
In this guide, we’ll walk you through how to use the Theme Customizer, key elements you can change, and a real-world example to help you make the most of it.
Why This Matters
A branded course site doesn’t just look good—it builds trust, improves user retention, and boosts course engagement. Tekmatix’s Theme Customizer allows you to deliver a professional experience without relying on developers or designers.
Step-by-Step: How To Use the Theme Customizer
Step 1: Access the Customizer
Go to your Courses & Memberships > Courses > Product Builder > Select Course.
Click Edit and go to Course Outline.
Click the "Customize" button.
Select "Browse System Templates" and choose the Neo Classic Theme to unlock the new customization features.
Step 2: Modify Your Theme
Once the Neo Classic theme is selected, you're ready to personalize:
You can modify design elements, preview in real-time, and save the theme for future use under the "My Templates" tab.
Key Areas You Can Customize
1. Logo (Required)
Show or hide it.
Choose between text or image logos.
Set click action (e.g., redirect to Course Home or Product Page).
Choose logo height (Small or Medium).
Place it in the top-left or center of the header.
2. Search Bar
Toggle visibility.
Add helper text (e.g., “Search for modules or topics”).
Change background or text color.
3. Hero Section (Required)
Set a solid color or background image.
Customize overlay effects (color and opacity).
Edit course title and description (font, size, alignment).
Choose layout spacing: Full, Medium, or Small height.
Personalize CTA button (color, label, alignment).
4. Welcome Body (Add Sections)
Add custom blocks with:
Images (with clickable links)
Videos
Text with formatting
CTA buttons (custom color, text, link)
5. Course Syllabus (Required)
Choose display style: by Category or as Posts.
Customize section labels (e.g., “Coming Soon,” “Show More”).
6. Course Sidebar
Show/hide Progress Bar (plus color and label options).
Instructor Section: Add headshot, name, title, and bio.
Cross-Sell Offers: Promote additional offers directly from the course.
Custom Sidebar Blocks: Insert promo banners, announcements, or CTAs.
Additional Customization Options
Lesson Page
Breadcrumb trail to help users navigate.
Customize background color.
Enable or disable auto-advance.
Adjust text alignment and completion button style.
Category Page
Toggle sidebar progress indicators.
Customize tooltip labels for better UX.
Sample Scenario: Customizing a Sales Training Course
Case:
Let’s say you're creating a Sales Mastery Course for new hires.
Use the Neo Classic theme and upload your company logo.
Enable the search bar with helper text like “Search for sales topics.”
In the Hero Section, add a motivational banner image with a CTA button saying “Start Learning Now.”
Add a Welcome Video block to introduce the course.
In the Sidebar, display the instructor’s photo and a Cross-Sell Block promoting your “Advanced Sales Techniques” course.
Create a progress bar with custom colors matching your brand.
This setup ensures new employees feel welcomed, guided, and exposed to further learning opportunities—all from one place.
Pro Tips
Use consistent colors that match your brand.
Preview changes before saving to avoid design clashes.
Save reusable layouts as templates for future use.
Use CTAs wisely to guide learners through your funnel.
Final Thoughts
The New Theme Customizer in Tekmatix empowers you to transform your course into a branded, user-friendly experience—without hiring a developer. From custom banners to CTA buttons, you’re in full control.
Now’s the perfect time to revisit your course design and give it the refresh it deserves!
How To Customize Your Course Experience Using the New Theme Customizer in Tekmatix
How To Customize Your Course Experience Using the New Theme Customizer in Tekmatix
Creating an engaging and branded learning environment just got easier! With Tekmatix’s New Theme Customizer, you can tailor your course layout—from logo to sidebars—without writing a single line of code. Whether you're designing a sales course, wellness workshop, or client onboarding program, this tool gives you full visual control.
In this guide, we’ll walk you through how to use the Theme Customizer, key elements you can change, and a real-world example to help you make the most of it.
Why This Matters
A branded course site doesn’t just look good—it builds trust, improves user retention, and boosts course engagement. Tekmatix’s Theme Customizer allows you to deliver a professional experience without relying on developers or designers.
Step-by-Step: How To Use the Theme Customizer
Step 1: Access the Customizer
Go to your Courses & Memberships > Courses > Product Builder > Select Course.
Click Edit and go to Course Outline.
Click the "Customize" button.
Select "Browse System Templates" and choose the Neo Classic Theme to unlock the new customization features.
Step 2: Modify Your Theme
Once the Neo Classic theme is selected, you're ready to personalize:
You can modify design elements, preview in real-time, and save the theme for future use under the "My Templates" tab.
Key Areas You Can Customize
1. Logo (Required)
Show or hide it.
Choose between text or image logos.
Set click action (e.g., redirect to Course Home or Product Page).
Choose logo height (Small or Medium).
Place it in the top-left or center of the header.
2. Search Bar
Toggle visibility.
Add helper text (e.g., “Search for modules or topics”).
Change background or text color.
3. Hero Section (Required)
Set a solid color or background image.
Customize overlay effects (color and opacity).
Edit course title and description (font, size, alignment).
Choose layout spacing: Full, Medium, or Small height.
Personalize CTA button (color, label, alignment).
4. Welcome Body (Add Sections)
Add custom blocks with:
Images (with clickable links)
Videos
Text with formatting
CTA buttons (custom color, text, link)
5. Course Syllabus (Required)
Choose display style: by Category or as Posts.
Customize section labels (e.g., “Coming Soon,” “Show More”).
6. Course Sidebar
Show/hide Progress Bar (plus color and label options).
Instructor Section: Add headshot, name, title, and bio.
Cross-Sell Offers: Promote additional offers directly from the course.
Custom Sidebar Blocks: Insert promo banners, announcements, or CTAs.
Additional Customization Options
Lesson Page
Breadcrumb trail to help users navigate.
Customize background color.
Enable or disable auto-advance.
Adjust text alignment and completion button style.
Category Page
Toggle sidebar progress indicators.
Customize tooltip labels for better UX.
Sample Scenario: Customizing a Sales Training Course
Case:
Let’s say you're creating a Sales Mastery Course for new hires.
Use the Neo Classic theme and upload your company logo.
Enable the search bar with helper text like “Search for sales topics.”
In the Hero Section, add a motivational banner image with a CTA button saying “Start Learning Now.”
Add a Welcome Video block to introduce the course.
In the Sidebar, display the instructor’s photo and a Cross-Sell Block promoting your “Advanced Sales Techniques” course.
Create a progress bar with custom colors matching your brand.
This setup ensures new employees feel welcomed, guided, and exposed to further learning opportunities—all from one place.
Pro Tips
Use consistent colors that match your brand.
Preview changes before saving to avoid design clashes.
Save reusable layouts as templates for future use.
Use CTAs wisely to guide learners through your funnel.
Final Thoughts
The New Theme Customizer in Tekmatix empowers you to transform your course into a branded, user-friendly experience—without hiring a developer. From custom banners to CTA buttons, you’re in full control.
Now’s the perfect time to revisit your course design and give it the refresh it deserves!
CRM
How To Customize Your Course Experience Using the New Theme Customizer in Tekmatix
How To Customize Your Course Experience Using the New Theme Customizer in Tekmatix
Creating an engaging and branded learning environment just got easier! With Tekmatix’s New Theme Customizer, you can tailor your course layout—from logo to sidebars—without writing a single line of code. Whether you're designing a sales course, wellness workshop, or client onboarding program, this tool gives you full visual control.
In this guide, we’ll walk you through how to use the Theme Customizer, key elements you can change, and a real-world example to help you make the most of it.
Why This Matters
A branded course site doesn’t just look good—it builds trust, improves user retention, and boosts course engagement. Tekmatix’s Theme Customizer allows you to deliver a professional experience without relying on developers or designers.
Step-by-Step: How To Use the Theme Customizer
Step 1: Access the Customizer
Go to your Courses & Memberships > Courses > Product Builder > Select Course.
Click Edit and go to Course Outline.
Click the "Customize" button.
Select "Browse System Templates" and choose the Neo Classic Theme to unlock the new customization features.
Step 2: Modify Your Theme
Once the Neo Classic theme is selected, you're ready to personalize:
You can modify design elements, preview in real-time, and save the theme for future use under the "My Templates" tab.
Key Areas You Can Customize
1. Logo (Required)
Show or hide it.
Choose between text or image logos.
Set click action (e.g., redirect to Course Home or Product Page).
Choose logo height (Small or Medium).
Place it in the top-left or center of the header.
2. Search Bar
Toggle visibility.
Add helper text (e.g., “Search for modules or topics”).
Change background or text color.
3. Hero Section (Required)
Set a solid color or background image.
Customize overlay effects (color and opacity).
Edit course title and description (font, size, alignment).
Choose layout spacing: Full, Medium, or Small height.
Personalize CTA button (color, label, alignment).
4. Welcome Body (Add Sections)
Add custom blocks with:
Images (with clickable links)
Videos
Text with formatting
CTA buttons (custom color, text, link)
5. Course Syllabus (Required)
Choose display style: by Category or as Posts.
Customize section labels (e.g., “Coming Soon,” “Show More”).
6. Course Sidebar
Show/hide Progress Bar (plus color and label options).
Instructor Section: Add headshot, name, title, and bio.
Cross-Sell Offers: Promote additional offers directly from the course.
Custom Sidebar Blocks: Insert promo banners, announcements, or CTAs.
Additional Customization Options
Lesson Page
Breadcrumb trail to help users navigate.
Customize background color.
Enable or disable auto-advance.
Adjust text alignment and completion button style.
Category Page
Toggle sidebar progress indicators.
Customize tooltip labels for better UX.
Sample Scenario: Customizing a Sales Training Course
Case:
Let’s say you're creating a Sales Mastery Course for new hires.
Use the Neo Classic theme and upload your company logo.
Enable the search bar with helper text like “Search for sales topics.”
In the Hero Section, add a motivational banner image with a CTA button saying “Start Learning Now.”
Add a Welcome Video block to introduce the course.
In the Sidebar, display the instructor’s photo and a Cross-Sell Block promoting your “Advanced Sales Techniques” course.
Create a progress bar with custom colors matching your brand.
This setup ensures new employees feel welcomed, guided, and exposed to further learning opportunities—all from one place.
Pro Tips
Use consistent colors that match your brand.
Preview changes before saving to avoid design clashes.
Save reusable layouts as templates for future use.
Use CTAs wisely to guide learners through your funnel.
Final Thoughts
The New Theme Customizer in Tekmatix empowers you to transform your course into a branded, user-friendly experience—without hiring a developer. From custom banners to CTA buttons, you’re in full control.
Now’s the perfect time to revisit your course design and give it the refresh it deserves!
How To Customize Your Course Experience Using the New Theme Customizer in Tekmatix
How To Customize Your Course Experience Using the New Theme Customizer in Tekmatix
Creating an engaging and branded learning environment just got easier! With Tekmatix’s New Theme Customizer, you can tailor your course layout—from logo to sidebars—without writing a single line of code. Whether you're designing a sales course, wellness workshop, or client onboarding program, this tool gives you full visual control.
In this guide, we’ll walk you through how to use the Theme Customizer, key elements you can change, and a real-world example to help you make the most of it.
Why This Matters
A branded course site doesn’t just look good—it builds trust, improves user retention, and boosts course engagement. Tekmatix’s Theme Customizer allows you to deliver a professional experience without relying on developers or designers.
Step-by-Step: How To Use the Theme Customizer
Step 1: Access the Customizer
Go to your Courses & Memberships > Courses > Product Builder > Select Course.
Click Edit and go to Course Outline.
Click the "Customize" button.
Select "Browse System Templates" and choose the Neo Classic Theme to unlock the new customization features.
Step 2: Modify Your Theme
Once the Neo Classic theme is selected, you're ready to personalize:
You can modify design elements, preview in real-time, and save the theme for future use under the "My Templates" tab.
Key Areas You Can Customize
1. Logo (Required)
Show or hide it.
Choose between text or image logos.
Set click action (e.g., redirect to Course Home or Product Page).
Choose logo height (Small or Medium).
Place it in the top-left or center of the header.
2. Search Bar
Toggle visibility.
Add helper text (e.g., “Search for modules or topics”).
Change background or text color.
3. Hero Section (Required)
Set a solid color or background image.
Customize overlay effects (color and opacity).
Edit course title and description (font, size, alignment).
Choose layout spacing: Full, Medium, or Small height.
Personalize CTA button (color, label, alignment).
4. Welcome Body (Add Sections)
Add custom blocks with:
Images (with clickable links)
Videos
Text with formatting
CTA buttons (custom color, text, link)
5. Course Syllabus (Required)
Choose display style: by Category or as Posts.
Customize section labels (e.g., “Coming Soon,” “Show More”).
6. Course Sidebar
Show/hide Progress Bar (plus color and label options).
Instructor Section: Add headshot, name, title, and bio.
Cross-Sell Offers: Promote additional offers directly from the course.
Custom Sidebar Blocks: Insert promo banners, announcements, or CTAs.
Additional Customization Options
Lesson Page
Breadcrumb trail to help users navigate.
Customize background color.
Enable or disable auto-advance.
Adjust text alignment and completion button style.
Category Page
Toggle sidebar progress indicators.
Customize tooltip labels for better UX.
Sample Scenario: Customizing a Sales Training Course
Case:
Let’s say you're creating a Sales Mastery Course for new hires.
Use the Neo Classic theme and upload your company logo.
Enable the search bar with helper text like “Search for sales topics.”
In the Hero Section, add a motivational banner image with a CTA button saying “Start Learning Now.”
Add a Welcome Video block to introduce the course.
In the Sidebar, display the instructor’s photo and a Cross-Sell Block promoting your “Advanced Sales Techniques” course.
Create a progress bar with custom colors matching your brand.
This setup ensures new employees feel welcomed, guided, and exposed to further learning opportunities—all from one place.
Pro Tips
Use consistent colors that match your brand.
Preview changes before saving to avoid design clashes.
Save reusable layouts as templates for future use.
Use CTAs wisely to guide learners through your funnel.
Final Thoughts
The New Theme Customizer in Tekmatix empowers you to transform your course into a branded, user-friendly experience—without hiring a developer. From custom banners to CTA buttons, you’re in full control.
Now’s the perfect time to revisit your course design and give it the refresh it deserves!

Join The TekMatix Newsletter
Get sent regular tech and business growth tips.
Web Design
How To Customize Your Course Experience Using the New Theme Customizer in Tekmatix
How To Customize Your Course Experience Using the New Theme Customizer in Tekmatix
Creating an engaging and branded learning environment just got easier! With Tekmatix’s New Theme Customizer, you can tailor your course layout—from logo to sidebars—without writing a single line of code. Whether you're designing a sales course, wellness workshop, or client onboarding program, this tool gives you full visual control.
In this guide, we’ll walk you through how to use the Theme Customizer, key elements you can change, and a real-world example to help you make the most of it.
Why This Matters
A branded course site doesn’t just look good—it builds trust, improves user retention, and boosts course engagement. Tekmatix’s Theme Customizer allows you to deliver a professional experience without relying on developers or designers.
Step-by-Step: How To Use the Theme Customizer
Step 1: Access the Customizer
Go to your Courses & Memberships > Courses > Product Builder > Select Course.
Click Edit and go to Course Outline.
Click the "Customize" button.
Select "Browse System Templates" and choose the Neo Classic Theme to unlock the new customization features.
Step 2: Modify Your Theme
Once the Neo Classic theme is selected, you're ready to personalize:
You can modify design elements, preview in real-time, and save the theme for future use under the "My Templates" tab.
Key Areas You Can Customize
1. Logo (Required)
Show or hide it.
Choose between text or image logos.
Set click action (e.g., redirect to Course Home or Product Page).
Choose logo height (Small or Medium).
Place it in the top-left or center of the header.
2. Search Bar
Toggle visibility.
Add helper text (e.g., “Search for modules or topics”).
Change background or text color.
3. Hero Section (Required)
Set a solid color or background image.
Customize overlay effects (color and opacity).
Edit course title and description (font, size, alignment).
Choose layout spacing: Full, Medium, or Small height.
Personalize CTA button (color, label, alignment).
4. Welcome Body (Add Sections)
Add custom blocks with:
Images (with clickable links)
Videos
Text with formatting
CTA buttons (custom color, text, link)
5. Course Syllabus (Required)
Choose display style: by Category or as Posts.
Customize section labels (e.g., “Coming Soon,” “Show More”).
6. Course Sidebar
Show/hide Progress Bar (plus color and label options).
Instructor Section: Add headshot, name, title, and bio.
Cross-Sell Offers: Promote additional offers directly from the course.
Custom Sidebar Blocks: Insert promo banners, announcements, or CTAs.
Additional Customization Options
Lesson Page
Breadcrumb trail to help users navigate.
Customize background color.
Enable or disable auto-advance.
Adjust text alignment and completion button style.
Category Page
Toggle sidebar progress indicators.
Customize tooltip labels for better UX.
Sample Scenario: Customizing a Sales Training Course
Case:
Let’s say you're creating a Sales Mastery Course for new hires.
Use the Neo Classic theme and upload your company logo.
Enable the search bar with helper text like “Search for sales topics.”
In the Hero Section, add a motivational banner image with a CTA button saying “Start Learning Now.”
Add a Welcome Video block to introduce the course.
In the Sidebar, display the instructor’s photo and a Cross-Sell Block promoting your “Advanced Sales Techniques” course.
Create a progress bar with custom colors matching your brand.
This setup ensures new employees feel welcomed, guided, and exposed to further learning opportunities—all from one place.
Pro Tips
Use consistent colors that match your brand.
Preview changes before saving to avoid design clashes.
Save reusable layouts as templates for future use.
Use CTAs wisely to guide learners through your funnel.
Final Thoughts
The New Theme Customizer in Tekmatix empowers you to transform your course into a branded, user-friendly experience—without hiring a developer. From custom banners to CTA buttons, you’re in full control.
Now’s the perfect time to revisit your course design and give it the refresh it deserves!
How To Customize Your Course Experience Using the New Theme Customizer in Tekmatix
How To Customize Your Course Experience Using the New Theme Customizer in Tekmatix
Creating an engaging and branded learning environment just got easier! With Tekmatix’s New Theme Customizer, you can tailor your course layout—from logo to sidebars—without writing a single line of code. Whether you're designing a sales course, wellness workshop, or client onboarding program, this tool gives you full visual control.
In this guide, we’ll walk you through how to use the Theme Customizer, key elements you can change, and a real-world example to help you make the most of it.
Why This Matters
A branded course site doesn’t just look good—it builds trust, improves user retention, and boosts course engagement. Tekmatix’s Theme Customizer allows you to deliver a professional experience without relying on developers or designers.
Step-by-Step: How To Use the Theme Customizer
Step 1: Access the Customizer
Go to your Courses & Memberships > Courses > Product Builder > Select Course.
Click Edit and go to Course Outline.
Click the "Customize" button.
Select "Browse System Templates" and choose the Neo Classic Theme to unlock the new customization features.
Step 2: Modify Your Theme
Once the Neo Classic theme is selected, you're ready to personalize:
You can modify design elements, preview in real-time, and save the theme for future use under the "My Templates" tab.
Key Areas You Can Customize
1. Logo (Required)
Show or hide it.
Choose between text or image logos.
Set click action (e.g., redirect to Course Home or Product Page).
Choose logo height (Small or Medium).
Place it in the top-left or center of the header.
2. Search Bar
Toggle visibility.
Add helper text (e.g., “Search for modules or topics”).
Change background or text color.
3. Hero Section (Required)
Set a solid color or background image.
Customize overlay effects (color and opacity).
Edit course title and description (font, size, alignment).
Choose layout spacing: Full, Medium, or Small height.
Personalize CTA button (color, label, alignment).
4. Welcome Body (Add Sections)
Add custom blocks with:
Images (with clickable links)
Videos
Text with formatting
CTA buttons (custom color, text, link)
5. Course Syllabus (Required)
Choose display style: by Category or as Posts.
Customize section labels (e.g., “Coming Soon,” “Show More”).
6. Course Sidebar
Show/hide Progress Bar (plus color and label options).
Instructor Section: Add headshot, name, title, and bio.
Cross-Sell Offers: Promote additional offers directly from the course.
Custom Sidebar Blocks: Insert promo banners, announcements, or CTAs.
Additional Customization Options
Lesson Page
Breadcrumb trail to help users navigate.
Customize background color.
Enable or disable auto-advance.
Adjust text alignment and completion button style.
Category Page
Toggle sidebar progress indicators.
Customize tooltip labels for better UX.
Sample Scenario: Customizing a Sales Training Course
Case:
Let’s say you're creating a Sales Mastery Course for new hires.
Use the Neo Classic theme and upload your company logo.
Enable the search bar with helper text like “Search for sales topics.”
In the Hero Section, add a motivational banner image with a CTA button saying “Start Learning Now.”
Add a Welcome Video block to introduce the course.
In the Sidebar, display the instructor’s photo and a Cross-Sell Block promoting your “Advanced Sales Techniques” course.
Create a progress bar with custom colors matching your brand.
This setup ensures new employees feel welcomed, guided, and exposed to further learning opportunities—all from one place.
Pro Tips
Use consistent colors that match your brand.
Preview changes before saving to avoid design clashes.
Save reusable layouts as templates for future use.
Use CTAs wisely to guide learners through your funnel.
Final Thoughts
The New Theme Customizer in Tekmatix empowers you to transform your course into a branded, user-friendly experience—without hiring a developer. From custom banners to CTA buttons, you’re in full control.
Now’s the perfect time to revisit your course design and give it the refresh it deserves!