Tekmatix Help Articles

Love your help


Use the search bar below to find help guides and articles for using Tekmatix

Use the search bar below to look for help articles you need.

How to Connect Claude AI to Tekmatix Using the MCP Integration (Step-by-Step)

How to Connect Claude AI to Tekmatix Using the MCP Integration (Step-by-Step)

July 14, 20266 min read

How to Connect Claude with Tekmatix (Step-by-Step Guide with Screenshots)

Want your AI assistant to actually know your business? With the new Tekmatix MCP connector, you can link Claude directly to your Tekmatix account in about five minutes — and then ask it anything about your contacts, workflows, calendars, and more. Here's exactly how to do it, click by click.


Why connect Claude to Tekmatix?

If you use Tekmatix to run your business, your CRM already holds the answers to questions you ask yourself every day: How many contacts do I have? Which workflows are actually live? What's on my calendar this week?


Once connected, Claude can securely read (and, where you allow it, update) your Tekmatix data — contacts, conversations, calendars, workflows, funnels, payments, social planner posts and more. Instead of clicking through dashboards, you just ask in plain English and Claude pulls live answers straight from your account.

What you'll need

  • A Claude account — log in at claude.ai. Custom connectors are available on paid plans (Pro, Max, Team or Enterprise).

  • Your Tekmatix login — you'll approve the connection inside Tekmatix, so make sure you can sign in to the right account and location.

  • About 5 minutes — five clicks in Claude, one URL to paste, and one approval screen in Tekmatix.


The whole process has three phases: add the connector in Claude → authorize the app in Tekmatix → ask Claude anything.


Step 1: Open Claude in your browser

Go to claude.ai/new in any browser and log in with the Claude account you want to link to Tekmatix. You'll land on a fresh chat screen — no need to type anything yet.
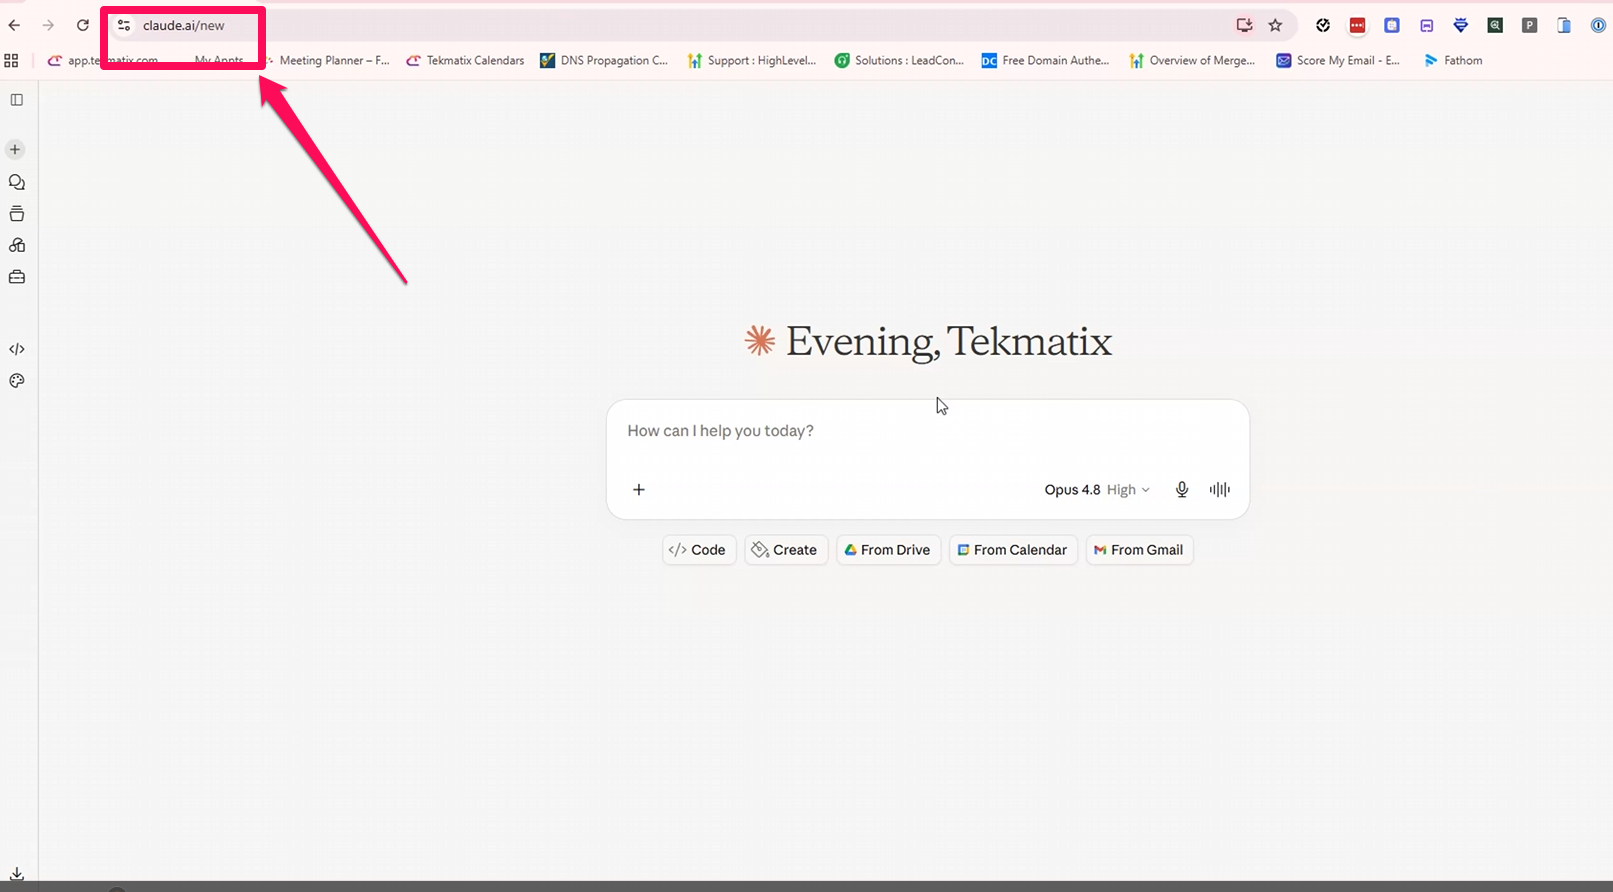


💡 Tip: Bookmark claude.ai/new — it always opens a brand-new chat.

Step 2: Open Settings from your profile icon

Click your profile icon in the bottom-left corner of the screen, then click Settings in the menu that pops up.
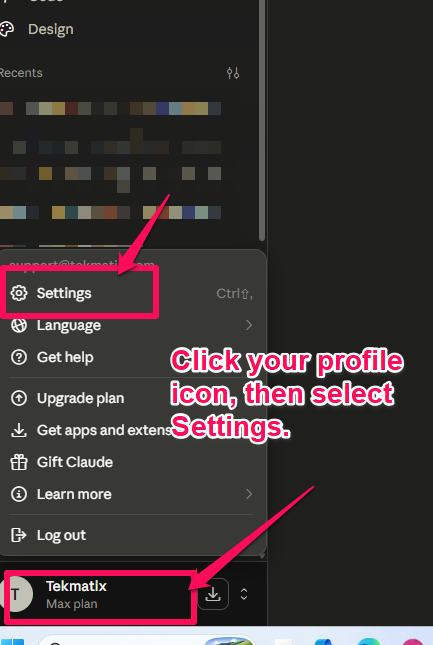


💡 Tip: Keyboard shortcut Ctrl + , (Cmd + , on Mac) opens Settings instantly.

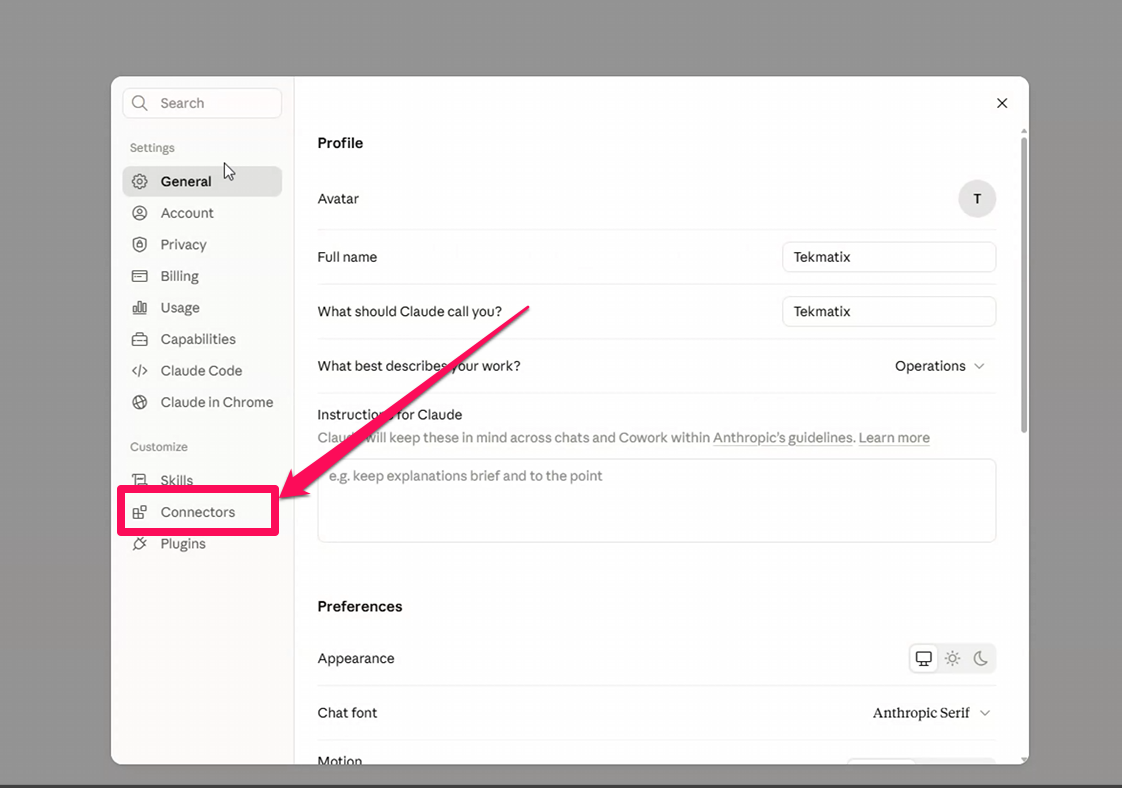
Step 3: Go to the Connectors section

The Settings panel opens on the General tab. In the left menu, under Customize, click Connectors. You'll see any connectors already linked to your account (Gmail, Google Drive, and so on).

Step 4: Click the Add button

In the top-right corner of the Connectors page, click Add. A small dropdown appears with two options: Browse connectors and Add custom connector.
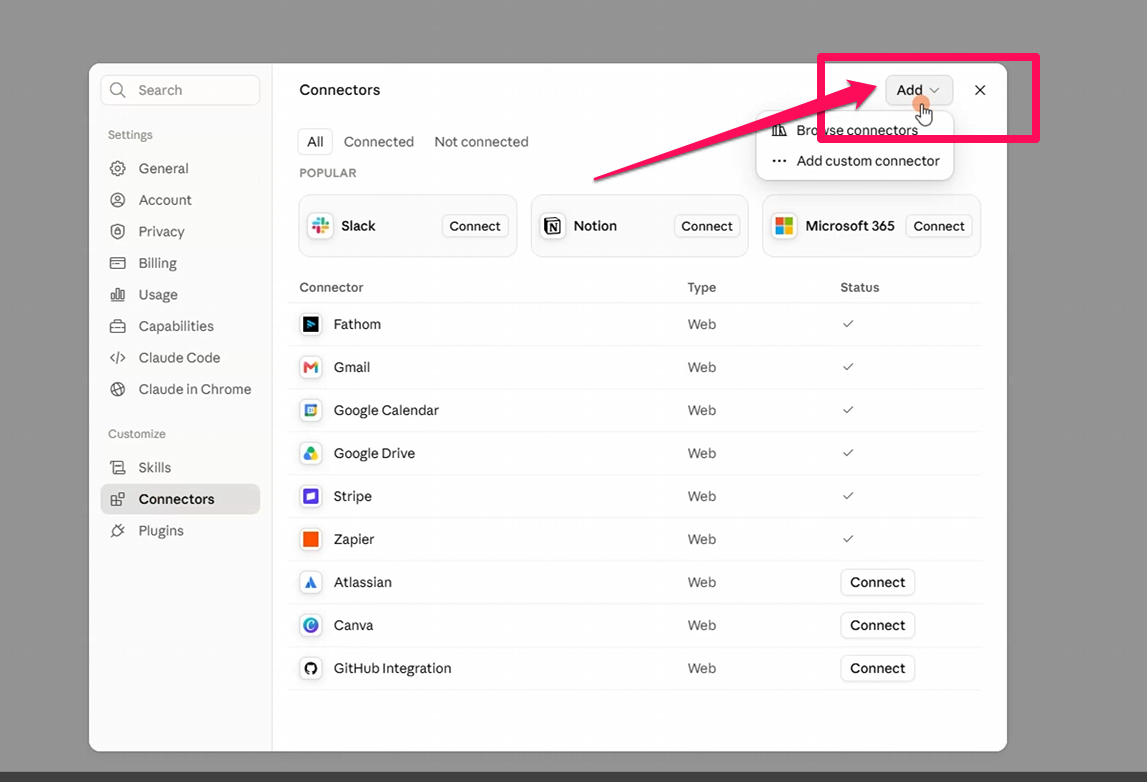

Step 5: Choose "Add custom connector"

From the dropdown, click Add custom connector. Tekmatix isn't in the pre-built list yet, so we add it as a custom connector using its MCP address.


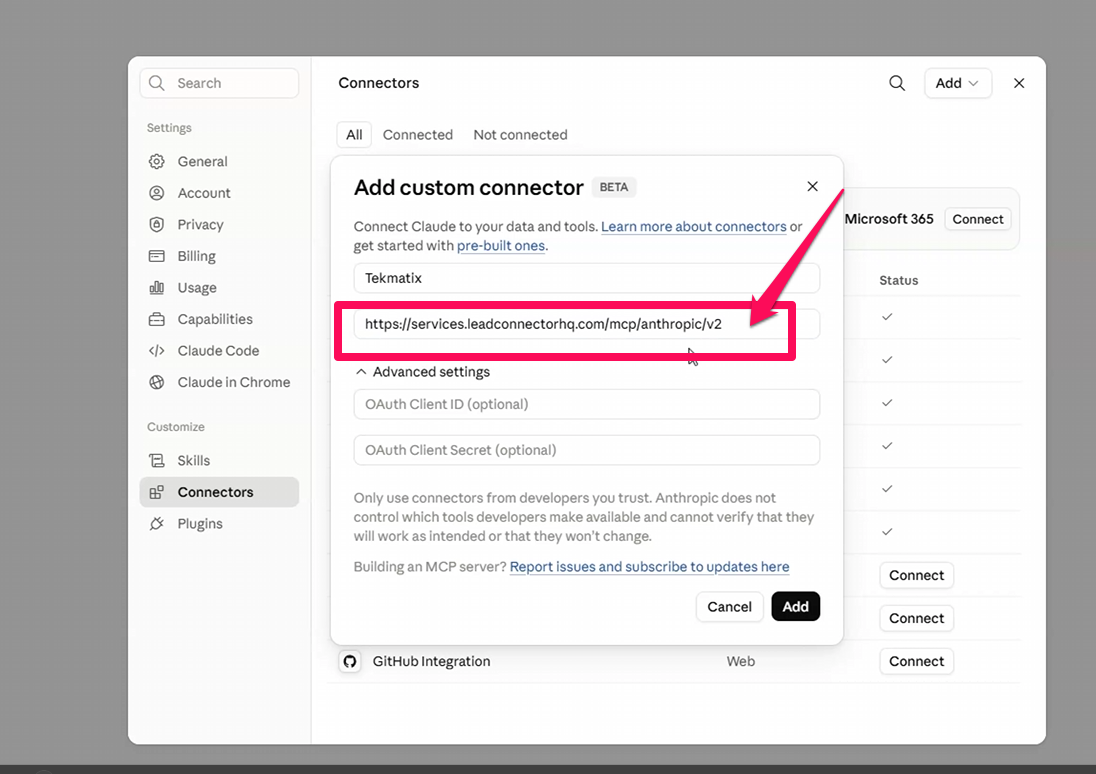
Step 6: Enter the Tekmatix connector details

A dialog called Add custom connector opens. Fill it in like this:


Then click the black Add button.


💡 Tip: Copy the URL exactly — one typo and the connector won't reach Tekmatix.

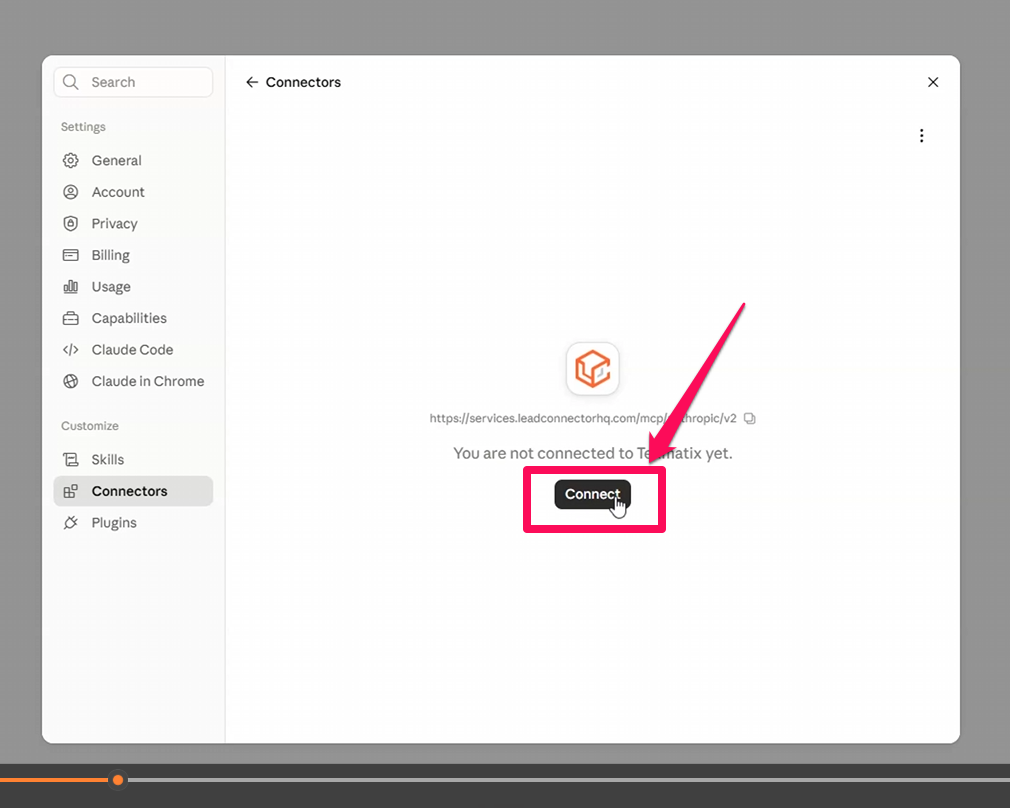
Step 7: Click Connect on your new connector

Tekmatix now appears in your connectors list. Open it and you'll see the message "You are not connected to Tekmatix yet." Click the Connect button.


A new browser tab opens on the LeadConnector Marketplace — Tekmatix's app store — to authorize the link.

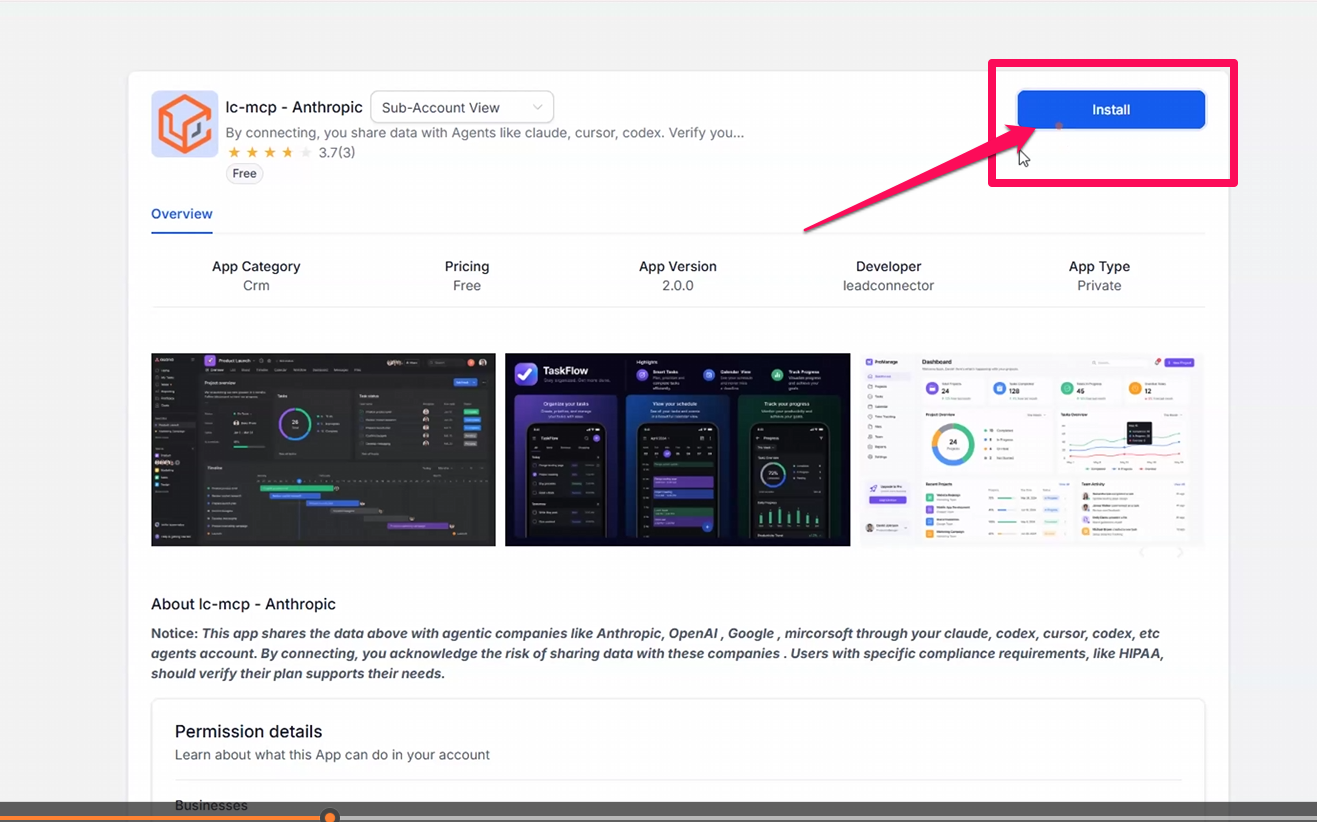
Step 8: Install the "lc-mcp – Anthropic" app

You'll land on the lc-mcp – Anthropic app page (developer: leadconnector, App Type: Private). If asked, choose the correct location/account to connect, then click the blue Install button.


Take a second to read the privacy notice on this page: by connecting, this app shares your account data with the AI agents you link (Claude, etc.).
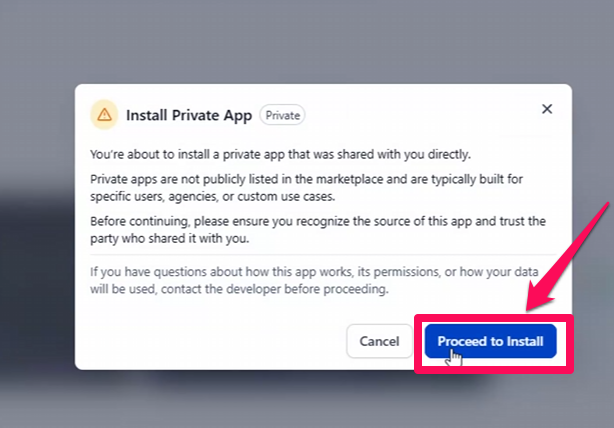
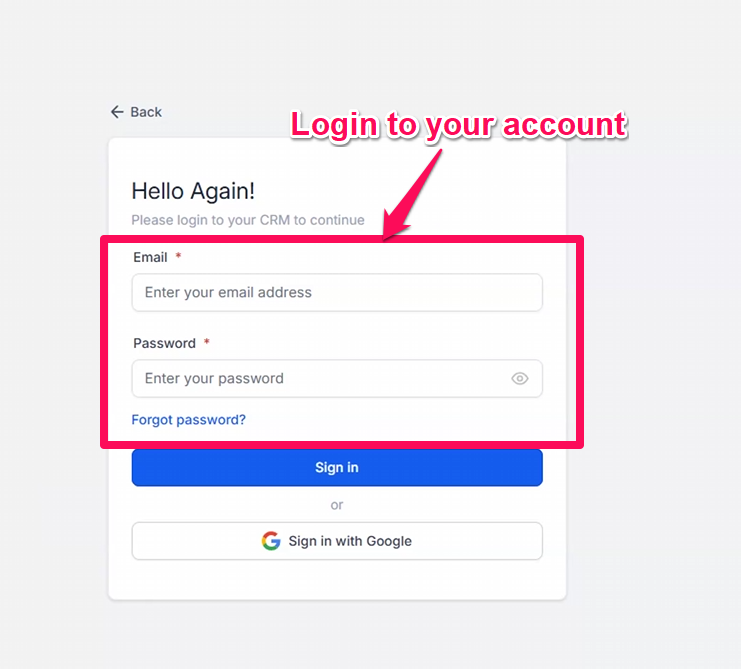
Step 9: Review permissions carefully — then Allow & Install

This is the most important screen of the whole setup. The install confirmation lists every permission by category — Contacts, Calendars, Payments, Social Planner, Workflows, Users, Voice AI and more.


Expand any category to fine-tune the checkboxes:


  • Read = Claude can view that data only.

  • Write = Claude can create, update or delete it.


Recommended security settings

Follow the principle of least privilege — grant only what you actually need. For most people, read-only is plenty for reporting and day-to-day questions. Specifically:


Users: Leave users.write disabled unless your integration specifically needs to create, update, or delete users. Most integrations only require users.readonly to retrieve user information. Enabling write access here grants permission to modify user accounts, so only turn it on when absolutely necessary.
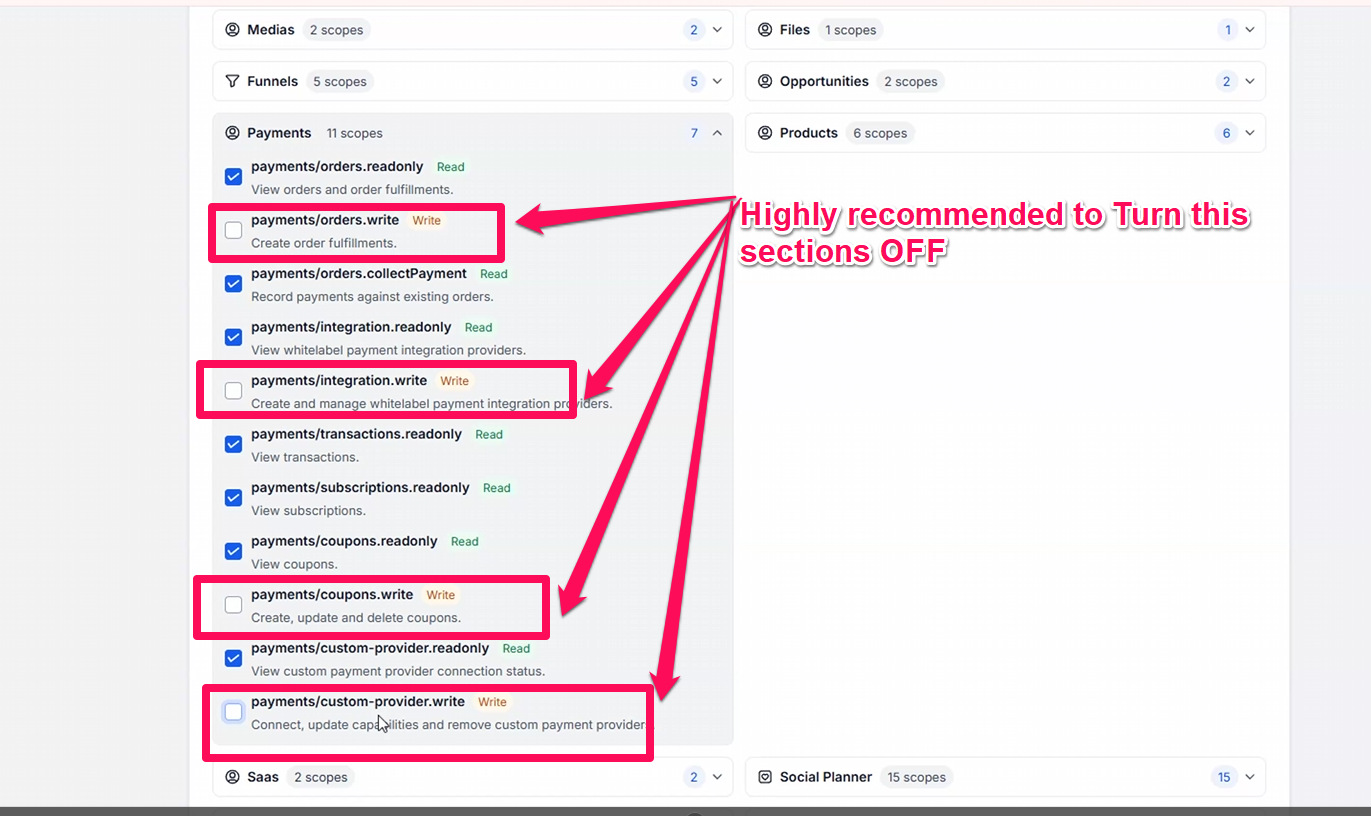


Payments: Leave these Write permissions disabled unless your integration specifically requires them:


  • payments/orders.write — creates order fulfilments

  • payments/integration.write — creates and manages whitelabel payment integration providers

  • payments/coupons.write — creates, updates, and deletes coupons

  • payments/custom-provider.write — connects, updates, and removes custom payment providers


The corresponding Read permissions are sufficient for most integrations. Only enable these Write scopes if Claude genuinely needs to modify payment settings.

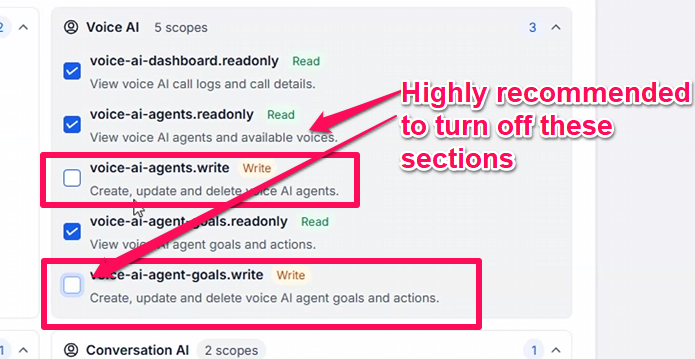
Voice AI: If you're not using Voice AI, disable the Voice AI write permissions. Voice AI features are usage-based, so granting unnecessary write access could allow AI tools to create resources that result in unintended usage or costs. The Read permissions are sufficient if you only need to view Voice AI information.
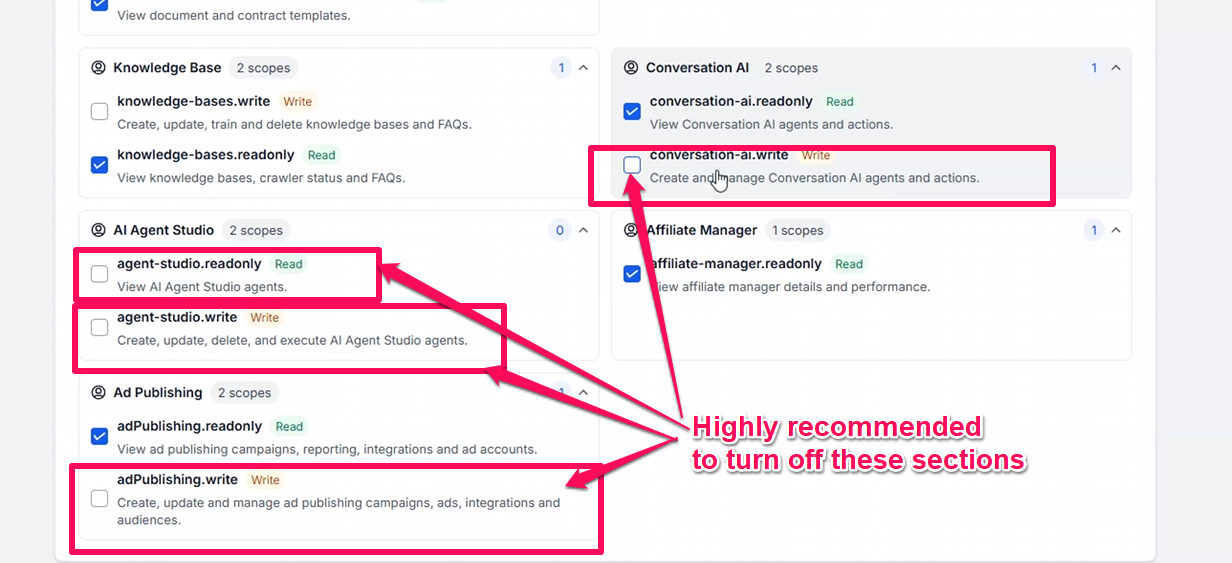
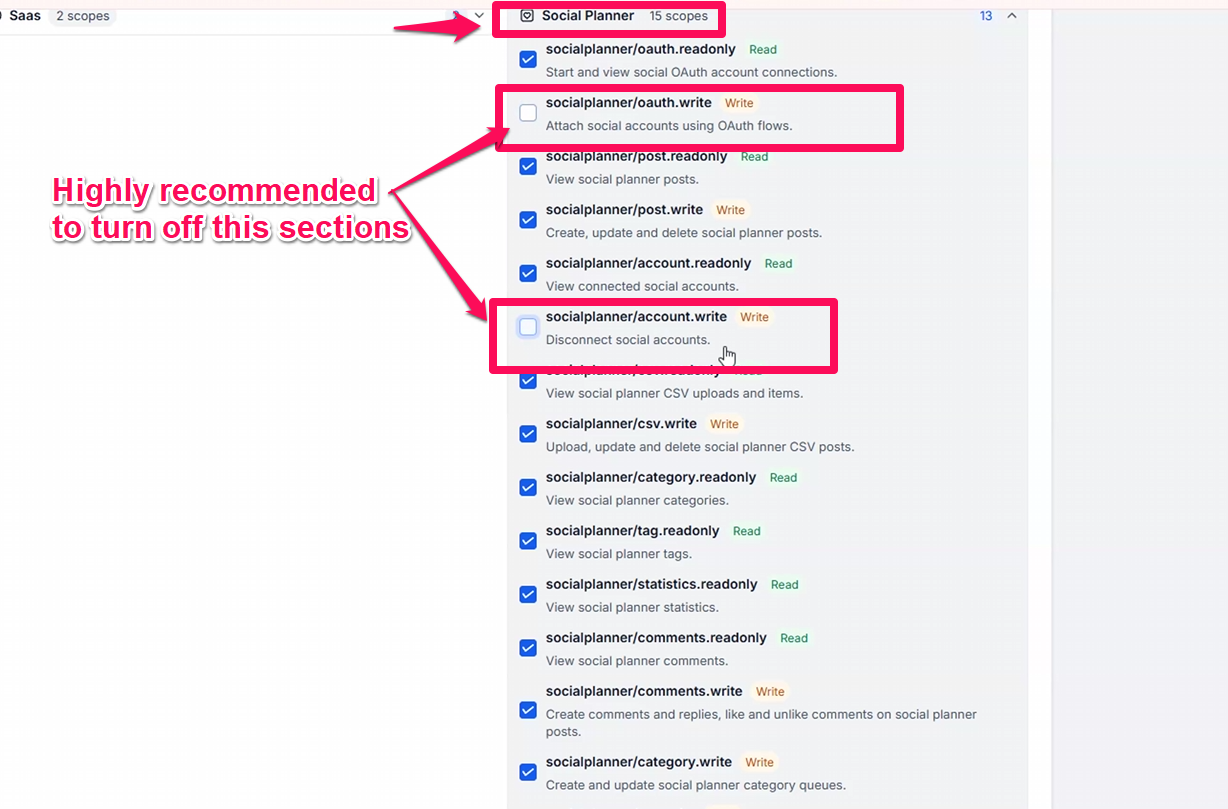
Once you've reviewed and configured the permissions, click Allow & Install to complete the integration.


💡 Tip: Start read-heavy. You can always reinstall later with more scopes if you need Claude to make changes.

You'll see a confirmation in Claude

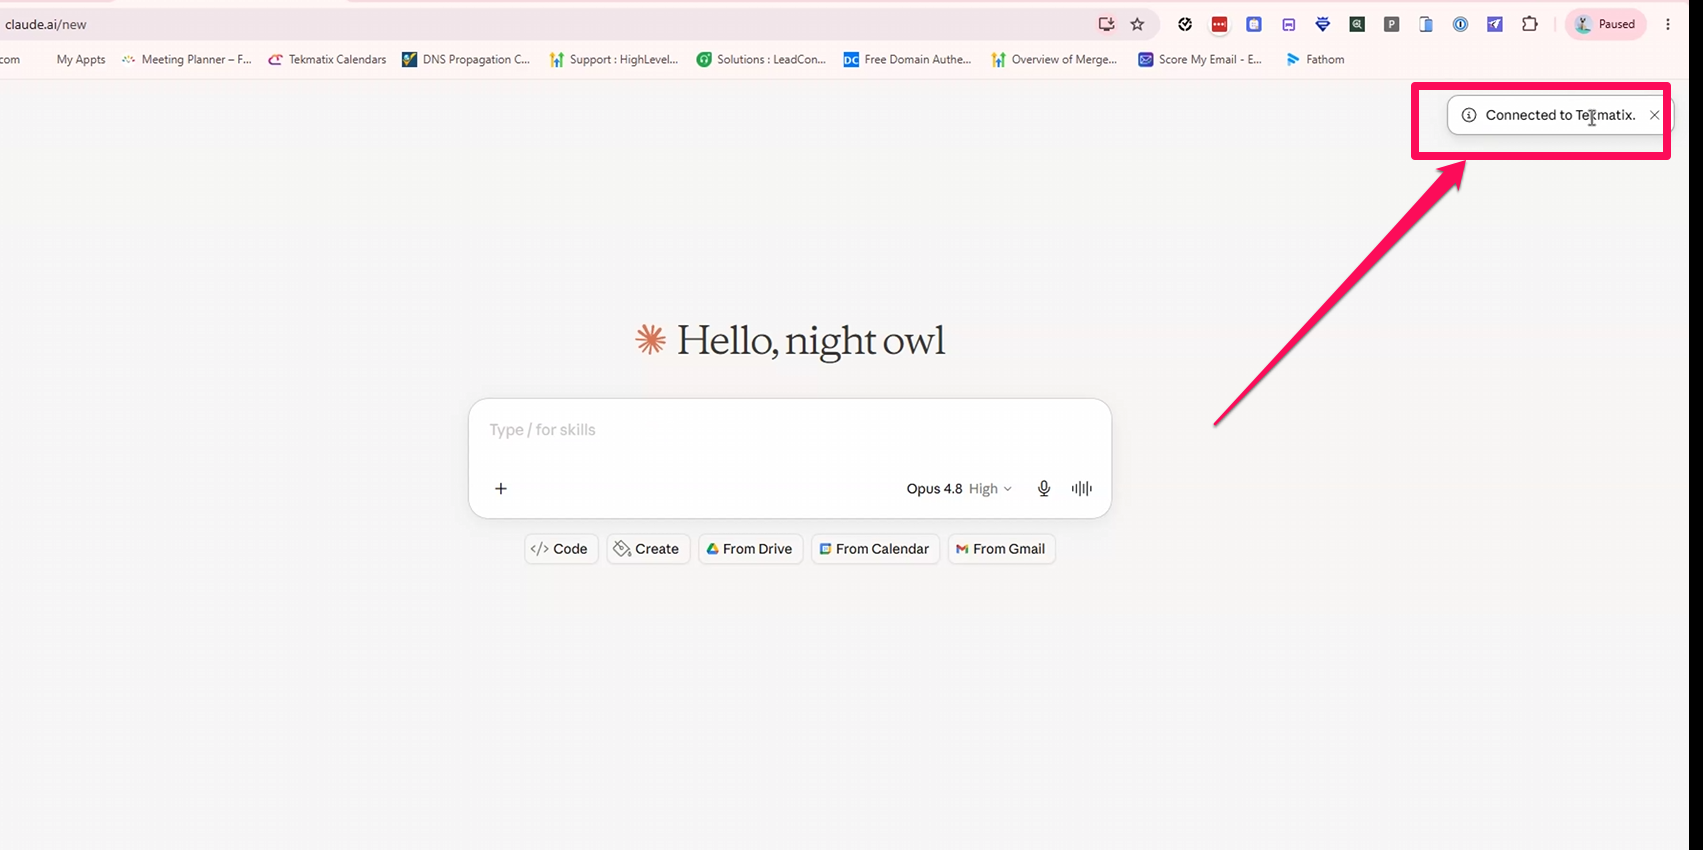
After clicking Allow & Install, Claude displays a confirmation in the top-right corner: "Connected to Tekmatix." Once you see that notification, you're ready to go.

Step 10: Test it — ask Claude about your account

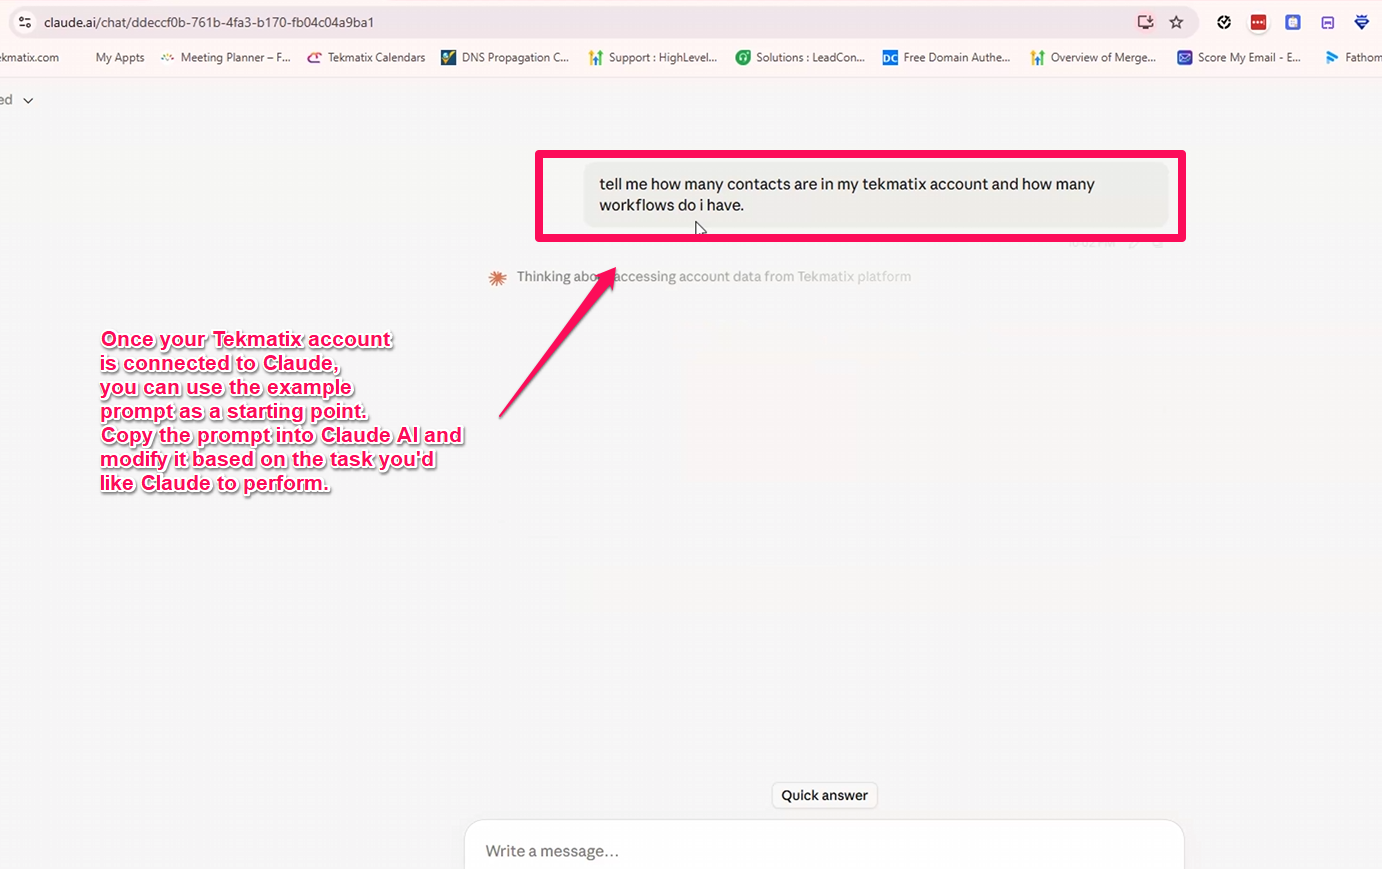
Back in Claude, start a new chat and ask something only Tekmatix would know. For example:


"Tell me how many contacts are in my Tekmatix account and how many workflows I have."


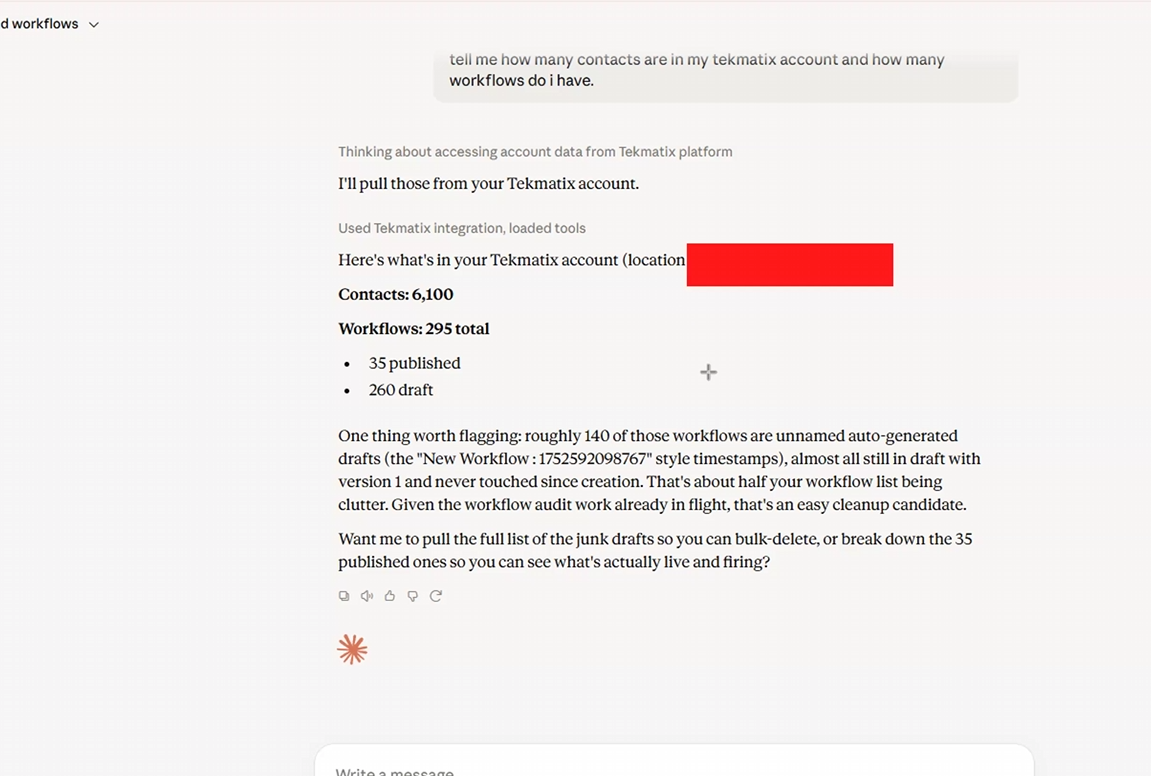
Claude queries Tekmatix live. In our demo, it found 6,100 contacts and 295 workflows (35 published, 260 draft) — and even flagged a batch of unused draft workflows as an easy cleanup candidate. That's the kind of proactive insight this connection unlocks.


The first time you ask, Claude may request approval for each tool action — just click Allow.


Verify the install inside Tekmatix

Want to double-check everything from the Tekmatix side?


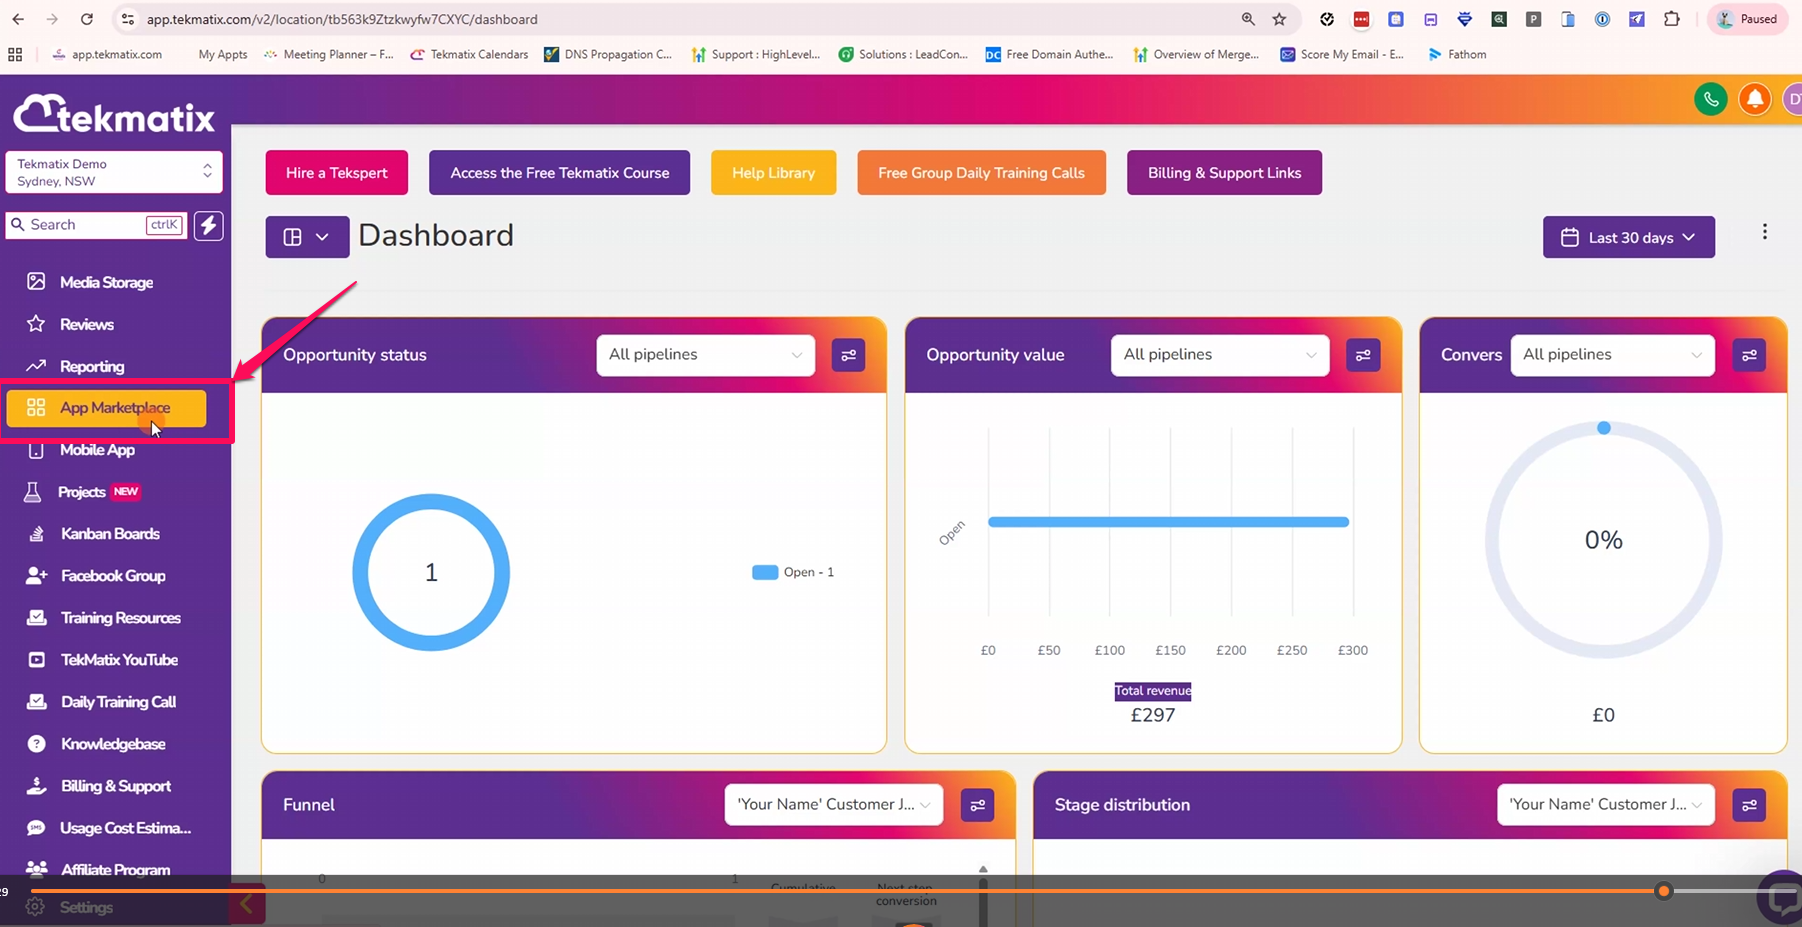
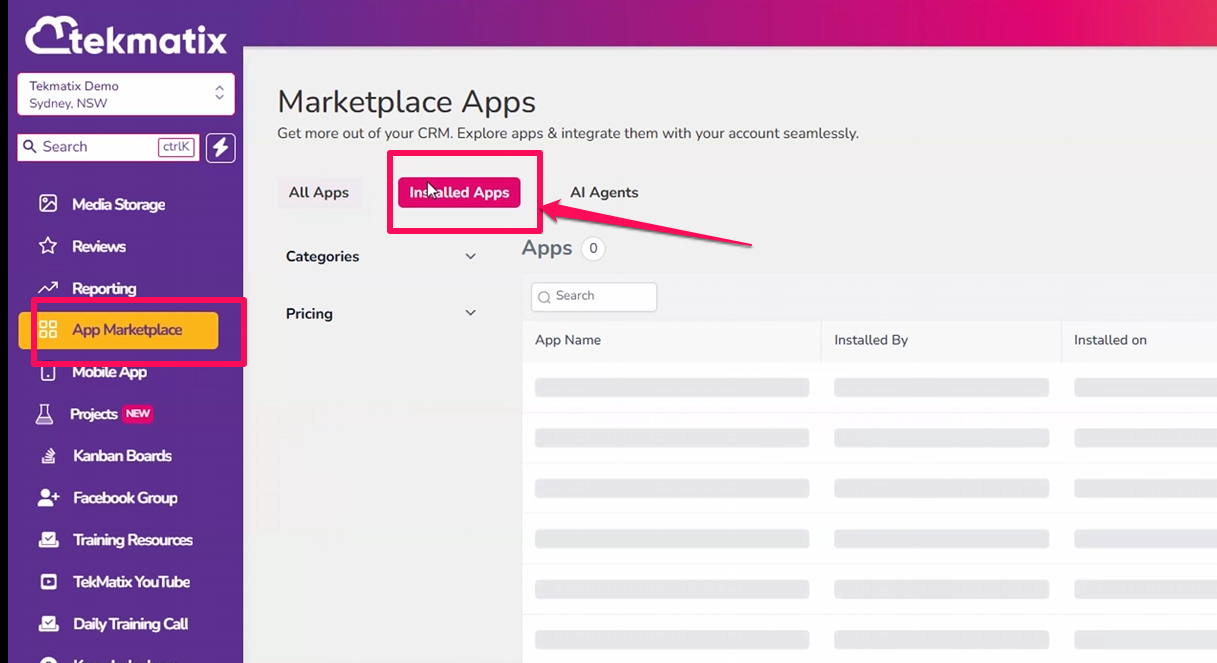
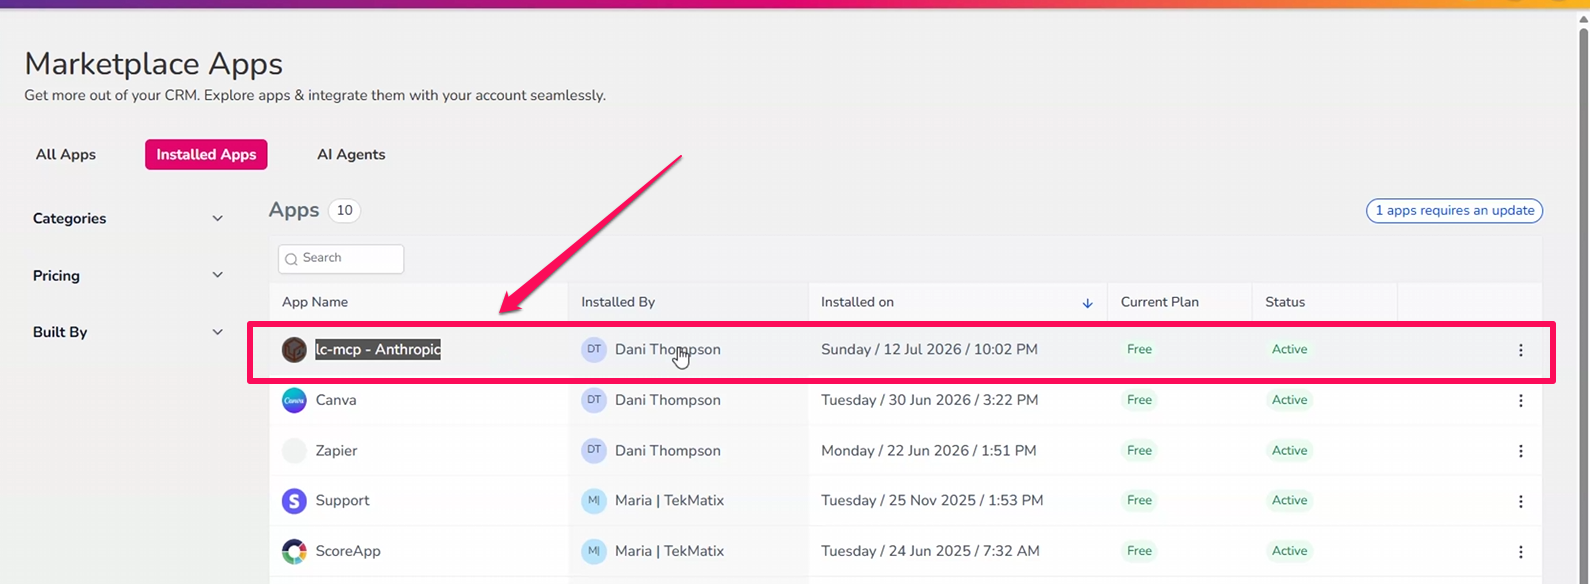
Return to your Tekmatix dashboard and click App Marketplace in the left-hand navigation menu, then open the Installed Apps tab. You should see lc-mcp – Anthropic at the top of the list with today's install date.


This is also where you manage or uninstall the connection at any time — removing the app instantly cuts Claude's access.


Troubleshooting

Connector won't add? Double-check the URL: https://services.leadconnectorhq.com/mcp/anthropic/v2 — no spaces, no trailing text. Custom connectors also require a paid Claude plan.


Connect button loops or fails? Make sure you're logged in to the right Tekmatix account in the same browser, then click Connect again and complete the marketplace install.


Claude can't see certain data? The scope for that data type may be unticked. Reopen the app install in Tekmatix and enable the relevant Read scopes, or reconnect from Claude's Connectors page.


Want to revoke access? Uninstall the app from Tekmatix (App Marketplace → Installed Apps) at any time.


What to try next

Claude is now your Tekmatix co-pilot. A few prompts to get you started:


  • "Summarise my pipeline — how many opportunities are open right now?"

  • "Which of my workflows are drafts I can safely delete?"

  • "What's on my Tekmatix calendar this week?"

  • "Draft a social planner post about our new course."


The setup takes five minutes. The time it saves you? That compounds every single day.


Found this helpful? Share it with another Tekmatix user — and if you get stuck on any step, drop a comment below.


How to connect Claude AI to TekmatixConnect Claude AI to TekmatixClaude AI Tekmatix integrationTekmatix MCP integrationClaude MCP connectorClaude AI custom connectorTekmatix AI integrationConnect Claude to TekmatixClaude AI CRM integrationAnthropic MCPMCP integration guideTekmatix automationClaude AI setupTekmatix tutorialAI CRM integrationClaude business automationTekmatix workflowsClaude AI for CRMTekmatix AI assistantClaude connector setupClaude AI productivityTekmatix App MarketplaceLeadConnector MCPClaude AI integration guideTekmatix AI tools
Back to Blog

Latest Blog Posts

How to Connect Claude AI to Tekmatix Using the MCP Integration (Step-by-Step)

How to Connect Claude AI to Tekmatix Using the MCP Integration (Step-by-Step)

July 14, 20266 min read

How to Connect Claude with Tekmatix (Step-by-Step Guide with Screenshots)

Want your AI assistant to actually know your business? With the new Tekmatix MCP connector, you can link Claude directly to your Tekmatix account in about five minutes — and then ask it anything about your contacts, workflows, calendars, and more. Here's exactly how to do it, click by click.


Why connect Claude to Tekmatix?

If you use Tekmatix to run your business, your CRM already holds the answers to questions you ask yourself every day: How many contacts do I have? Which workflows are actually live? What's on my calendar this week?


Once connected, Claude can securely read (and, where you allow it, update) your Tekmatix data — contacts, conversations, calendars, workflows, funnels, payments, social planner posts and more. Instead of clicking through dashboards, you just ask in plain English and Claude pulls live answers straight from your account.

What you'll need

  • A Claude account — log in at claude.ai. Custom connectors are available on paid plans (Pro, Max, Team or Enterprise).

  • Your Tekmatix login — you'll approve the connection inside Tekmatix, so make sure you can sign in to the right account and location.

  • About 5 minutes — five clicks in Claude, one URL to paste, and one approval screen in Tekmatix.


The whole process has three phases: add the connector in Claude → authorize the app in Tekmatix → ask Claude anything.


Step 1: Open Claude in your browser

Go to claude.ai/new in any browser and log in with the Claude account you want to link to Tekmatix. You'll land on a fresh chat screen — no need to type anything yet.


💡 Tip: Bookmark claude.ai/new — it always opens a brand-new chat.

Step 2: Open Settings from your profile icon

Click your profile icon in the bottom-left corner of the screen, then click Settings in the menu that pops up.


💡 Tip: Keyboard shortcut Ctrl + , (Cmd + , on Mac) opens Settings instantly.

Step 3: Go to the Connectors section

The Settings panel opens on the General tab. In the left menu, under Customize, click Connectors. You'll see any connectors already linked to your account (Gmail, Google Drive, and so on).


Step 4: Click the Add button

In the top-right corner of the Connectors page, click Add. A small dropdown appears with two options: Browse connectors and Add custom connector.


Step 5: Choose "Add custom connector"

From the dropdown, click Add custom connector. Tekmatix isn't in the pre-built list yet, so we add it as a custom connector using its MCP address.


Step 6: Enter the Tekmatix connector details

A dialog called Add custom connector opens. Fill it in like this:


Then click the black Add button.


💡 Tip: Copy the URL exactly — one typo and the connector won't reach Tekmatix.

Step 7: Click Connect on your new connector

Tekmatix now appears in your connectors list. Open it and you'll see the message "You are not connected to Tekmatix yet." Click the Connect button.


A new browser tab opens on the LeadConnector Marketplace — Tekmatix's app store — to authorize the link.


Step 8: Install the "lc-mcp – Anthropic" app

You'll land on the lc-mcp – Anthropic app page (developer: leadconnector, App Type: Private). If asked, choose the correct location/account to connect, then click the blue Install button.


Take a second to read the privacy notice on this page: by connecting, this app shares your account data with the AI agents you link (Claude, etc.).


Step 9: Review permissions carefully — then Allow & Install

This is the most important screen of the whole setup. The install confirmation lists every permission by category — Contacts, Calendars, Payments, Social Planner, Workflows, Users, Voice AI and more.


Expand any category to fine-tune the checkboxes:


  • Read = Claude can view that data only.

  • Write = Claude can create, update or delete it.


Recommended security settings

Follow the principle of least privilege — grant only what you actually need. For most people, read-only is plenty for reporting and day-to-day questions. Specifically:


Users: Leave users.write disabled unless your integration specifically needs to create, update, or delete users. Most integrations only require users.readonly to retrieve user information. Enabling write access here grants permission to modify user accounts, so only turn it on when absolutely necessary.


Payments: Leave these Write permissions disabled unless your integration specifically requires them:


  • payments/orders.write — creates order fulfilments

  • payments/integration.write — creates and manages whitelabel payment integration providers

  • payments/coupons.write — creates, updates, and deletes coupons

  • payments/custom-provider.write — connects, updates, and removes custom payment providers


The corresponding Read permissions are sufficient for most integrations. Only enable these Write scopes if Claude genuinely needs to modify payment settings.

Voice AI: If you're not using Voice AI, disable the Voice AI write permissions. Voice AI features are usage-based, so granting unnecessary write access could allow AI tools to create resources that result in unintended usage or costs. The Read permissions are sufficient if you only need to view Voice AI information.


Once you've reviewed and configured the permissions, click Allow & Install to complete the integration.


💡 Tip: Start read-heavy. You can always reinstall later with more scopes if you need Claude to make changes.

You'll see a confirmation in Claude

After clicking Allow & Install, Claude displays a confirmation in the top-right corner: "Connected to Tekmatix." Once you see that notification, you're ready to go.


Step 10: Test it — ask Claude about your account

Back in Claude, start a new chat and ask something only Tekmatix would know. For example:


"Tell me how many contacts are in my Tekmatix account and how many workflows I have."


Claude queries Tekmatix live. In our demo, it found 6,100 contacts and 295 workflows (35 published, 260 draft) — and even flagged a batch of unused draft workflows as an easy cleanup candidate. That's the kind of proactive insight this connection unlocks.


The first time you ask, Claude may request approval for each tool action — just click Allow.


Verify the install inside Tekmatix

Want to double-check everything from the Tekmatix side?


Return to your Tekmatix dashboard and click App Marketplace in the left-hand navigation menu, then open the Installed Apps tab. You should see lc-mcp – Anthropic at the top of the list with today's install date.


This is also where you manage or uninstall the connection at any time — removing the app instantly cuts Claude's access.

Troubleshooting

Connector won't add? Double-check the URL: https://services.leadconnectorhq.com/mcp/anthropic/v2 — no spaces, no trailing text. Custom connectors also require a paid Claude plan.


Connect button loops or fails? Make sure you're logged in to the right Tekmatix account in the same browser, then click Connect again and complete the marketplace install.


Claude can't see certain data? The scope for that data type may be unticked. Reopen the app install in Tekmatix and enable the relevant Read scopes, or reconnect from Claude's Connectors page.


Want to revoke access? Uninstall the app from Tekmatix (App Marketplace → Installed Apps) at any time.


What to try next

Claude is now your Tekmatix co-pilot. A few prompts to get you started:


  • "Summarise my pipeline — how many opportunities are open right now?"

  • "Which of my workflows are drafts I can safely delete?"

  • "What's on my Tekmatix calendar this week?"

  • "Draft a social planner post about our new course."


The setup takes five minutes. The time it saves you? That compounds every single day.


Found this helpful? Share it with another Tekmatix user — and if you get stuck on any step, drop a comment below.


How to connect Claude AI to TekmatixConnect Claude AI to TekmatixClaude AI Tekmatix integrationTekmatix MCP integrationClaude MCP connectorClaude AI custom connectorTekmatix AI integrationConnect Claude to TekmatixClaude AI CRM integrationAnthropic MCPMCP integration guideTekmatix automationClaude AI setupTekmatix tutorialAI CRM integrationClaude business automationTekmatix workflowsClaude AI for CRMTekmatix AI assistantClaude connector setupClaude AI productivityTekmatix App MarketplaceLeadConnector MCPClaude AI integration guideTekmatix AI tools
Back to Blog

Marketing

How to Connect Claude AI to Tekmatix Using the MCP Integration (Step-by-Step)

How to Connect Claude AI to Tekmatix Using the MCP Integration (Step-by-Step)

July 14, 20266 min read

How to Connect Claude with Tekmatix (Step-by-Step Guide with Screenshots)

Want your AI assistant to actually know your business? With the new Tekmatix MCP connector, you can link Claude directly to your Tekmatix account in about five minutes — and then ask it anything about your contacts, workflows, calendars, and more. Here's exactly how to do it, click by click.


Why connect Claude to Tekmatix?

If you use Tekmatix to run your business, your CRM already holds the answers to questions you ask yourself every day: How many contacts do I have? Which workflows are actually live? What's on my calendar this week?


Once connected, Claude can securely read (and, where you allow it, update) your Tekmatix data — contacts, conversations, calendars, workflows, funnels, payments, social planner posts and more. Instead of clicking through dashboards, you just ask in plain English and Claude pulls live answers straight from your account.

What you'll need

  • A Claude account — log in at claude.ai. Custom connectors are available on paid plans (Pro, Max, Team or Enterprise).

  • Your Tekmatix login — you'll approve the connection inside Tekmatix, so make sure you can sign in to the right account and location.

  • About 5 minutes — five clicks in Claude, one URL to paste, and one approval screen in Tekmatix.


The whole process has three phases: add the connector in Claude → authorize the app in Tekmatix → ask Claude anything.


Step 1: Open Claude in your browser

Go to claude.ai/new in any browser and log in with the Claude account you want to link to Tekmatix. You'll land on a fresh chat screen — no need to type anything yet.


💡 Tip: Bookmark claude.ai/new — it always opens a brand-new chat.

Step 2: Open Settings from your profile icon

Click your profile icon in the bottom-left corner of the screen, then click Settings in the menu that pops up.


💡 Tip: Keyboard shortcut Ctrl + , (Cmd + , on Mac) opens Settings instantly.

Step 3: Go to the Connectors section

The Settings panel opens on the General tab. In the left menu, under Customize, click Connectors. You'll see any connectors already linked to your account (Gmail, Google Drive, and so on).


Step 4: Click the Add button

In the top-right corner of the Connectors page, click Add. A small dropdown appears with two options: Browse connectors and Add custom connector.


Step 5: Choose "Add custom connector"

From the dropdown, click Add custom connector. Tekmatix isn't in the pre-built list yet, so we add it as a custom connector using its MCP address.


Step 6: Enter the Tekmatix connector details

A dialog called Add custom connector opens. Fill it in like this:


Then click the black Add button.


💡 Tip: Copy the URL exactly — one typo and the connector won't reach Tekmatix.

Step 7: Click Connect on your new connector

Tekmatix now appears in your connectors list. Open it and you'll see the message "You are not connected to Tekmatix yet." Click the Connect button.


A new browser tab opens on the LeadConnector Marketplace — Tekmatix's app store — to authorize the link.


Step 8: Install the "lc-mcp – Anthropic" app

You'll land on the lc-mcp – Anthropic app page (developer: leadconnector, App Type: Private). If asked, choose the correct location/account to connect, then click the blue Install button.


Take a second to read the privacy notice on this page: by connecting, this app shares your account data with the AI agents you link (Claude, etc.).


Step 9: Review permissions carefully — then Allow & Install

This is the most important screen of the whole setup. The install confirmation lists every permission by category — Contacts, Calendars, Payments, Social Planner, Workflows, Users, Voice AI and more.


Expand any category to fine-tune the checkboxes:


  • Read = Claude can view that data only.

  • Write = Claude can create, update or delete it.


Recommended security settings

Follow the principle of least privilege — grant only what you actually need. For most people, read-only is plenty for reporting and day-to-day questions. Specifically:


Users: Leave users.write disabled unless your integration specifically needs to create, update, or delete users. Most integrations only require users.readonly to retrieve user information. Enabling write access here grants permission to modify user accounts, so only turn it on when absolutely necessary.


Payments: Leave these Write permissions disabled unless your integration specifically requires them:


  • payments/orders.write — creates order fulfilments

  • payments/integration.write — creates and manages whitelabel payment integration providers

  • payments/coupons.write — creates, updates, and deletes coupons

  • payments/custom-provider.write — connects, updates, and removes custom payment providers


The corresponding Read permissions are sufficient for most integrations. Only enable these Write scopes if Claude genuinely needs to modify payment settings.

Voice AI: If you're not using Voice AI, disable the Voice AI write permissions. Voice AI features are usage-based, so granting unnecessary write access could allow AI tools to create resources that result in unintended usage or costs. The Read permissions are sufficient if you only need to view Voice AI information.


Once you've reviewed and configured the permissions, click Allow & Install to complete the integration.


💡 Tip: Start read-heavy. You can always reinstall later with more scopes if you need Claude to make changes.

You'll see a confirmation in Claude

After clicking Allow & Install, Claude displays a confirmation in the top-right corner: "Connected to Tekmatix." Once you see that notification, you're ready to go.


Step 10: Test it — ask Claude about your account

Back in Claude, start a new chat and ask something only Tekmatix would know. For example:


"Tell me how many contacts are in my Tekmatix account and how many workflows I have."


Claude queries Tekmatix live. In our demo, it found 6,100 contacts and 295 workflows (35 published, 260 draft) — and even flagged a batch of unused draft workflows as an easy cleanup candidate. That's the kind of proactive insight this connection unlocks.


The first time you ask, Claude may request approval for each tool action — just click Allow.


Verify the install inside Tekmatix

Want to double-check everything from the Tekmatix side?


Return to your Tekmatix dashboard and click App Marketplace in the left-hand navigation menu, then open the Installed Apps tab. You should see lc-mcp – Anthropic at the top of the list with today's install date.


This is also where you manage or uninstall the connection at any time — removing the app instantly cuts Claude's access.


Troubleshooting

Connector won't add? Double-check the URL: https://services.leadconnectorhq.com/mcp/anthropic/v2 — no spaces, no trailing text. Custom connectors also require a paid Claude plan.


Connect button loops or fails? Make sure you're logged in to the right Tekmatix account in the same browser, then click Connect again and complete the marketplace install.


Claude can't see certain data? The scope for that data type may be unticked. Reopen the app install in Tekmatix and enable the relevant Read scopes, or reconnect from Claude's Connectors page.


Want to revoke access? Uninstall the app from Tekmatix (App Marketplace → Installed Apps) at any time.


What to try next

Claude is now your Tekmatix co-pilot. A few prompts to get you started:


  • "Summarise my pipeline — how many opportunities are open right now?"

  • "Which of my workflows are drafts I can safely delete?"

  • "What's on my Tekmatix calendar this week?"

  • "Draft a social planner post about our new course."


The setup takes five minutes. The time it saves you? That compounds every single day.


Found this helpful? Share it with another Tekmatix user — and if you get stuck on any step, drop a comment below.


How to connect Claude AI to TekmatixConnect Claude AI to TekmatixClaude AI Tekmatix integrationTekmatix MCP integrationClaude MCP connectorClaude AI custom connectorTekmatix AI integrationConnect Claude to TekmatixClaude AI CRM integrationAnthropic MCPMCP integration guideTekmatix automationClaude AI setupTekmatix tutorialAI CRM integrationClaude business automationTekmatix workflowsClaude AI for CRMTekmatix AI assistantClaude connector setupClaude AI productivityTekmatix App MarketplaceLeadConnector MCPClaude AI integration guideTekmatix AI tools
Back to Blog
How to Connect Claude AI to Tekmatix Using the MCP Integration (Step-by-Step)

How to Connect Claude AI to Tekmatix Using the MCP Integration (Step-by-Step)

July 14, 20266 min read

How to Connect Claude with Tekmatix (Step-by-Step Guide with Screenshots)

Want your AI assistant to actually know your business? With the new Tekmatix MCP connector, you can link Claude directly to your Tekmatix account in about five minutes — and then ask it anything about your contacts, workflows, calendars, and more. Here's exactly how to do it, click by click.


Why connect Claude to Tekmatix?

If you use Tekmatix to run your business, your CRM already holds the answers to questions you ask yourself every day: How many contacts do I have? Which workflows are actually live? What's on my calendar this week?


Once connected, Claude can securely read (and, where you allow it, update) your Tekmatix data — contacts, conversations, calendars, workflows, funnels, payments, social planner posts and more. Instead of clicking through dashboards, you just ask in plain English and Claude pulls live answers straight from your account.

What you'll need

  • A Claude account — log in at claude.ai. Custom connectors are available on paid plans (Pro, Max, Team or Enterprise).

  • Your Tekmatix login — you'll approve the connection inside Tekmatix, so make sure you can sign in to the right account and location.

  • About 5 minutes — five clicks in Claude, one URL to paste, and one approval screen in Tekmatix.


The whole process has three phases: add the connector in Claude → authorize the app in Tekmatix → ask Claude anything.


Step 1: Open Claude in your browser

Go to claude.ai/new in any browser and log in with the Claude account you want to link to Tekmatix. You'll land on a fresh chat screen — no need to type anything yet.


💡 Tip: Bookmark claude.ai/new — it always opens a brand-new chat.

Step 2: Open Settings from your profile icon

Click your profile icon in the bottom-left corner of the screen, then click Settings in the menu that pops up.


💡 Tip: Keyboard shortcut Ctrl + , (Cmd + , on Mac) opens Settings instantly.

Step 3: Go to the Connectors section

The Settings panel opens on the General tab. In the left menu, under Customize, click Connectors. You'll see any connectors already linked to your account (Gmail, Google Drive, and so on).


Step 4: Click the Add button

In the top-right corner of the Connectors page, click Add. A small dropdown appears with two options: Browse connectors and Add custom connector.


Step 5: Choose "Add custom connector"

From the dropdown, click Add custom connector. Tekmatix isn't in the pre-built list yet, so we add it as a custom connector using its MCP address.


Step 6: Enter the Tekmatix connector details

A dialog called Add custom connector opens. Fill it in like this:


Then click the black Add button.


💡 Tip: Copy the URL exactly — one typo and the connector won't reach Tekmatix.

Step 7: Click Connect on your new connector

Tekmatix now appears in your connectors list. Open it and you'll see the message "You are not connected to Tekmatix yet." Click the Connect button.


A new browser tab opens on the LeadConnector Marketplace — Tekmatix's app store — to authorize the link.


Step 8: Install the "lc-mcp – Anthropic" app

You'll land on the lc-mcp – Anthropic app page (developer: leadconnector, App Type: Private). If asked, choose the correct location/account to connect, then click the blue Install button.


Take a second to read the privacy notice on this page: by connecting, this app shares your account data with the AI agents you link (Claude, etc.).


Step 9: Review permissions carefully — then Allow & Install

This is the most important screen of the whole setup. The install confirmation lists every permission by category — Contacts, Calendars, Payments, Social Planner, Workflows, Users, Voice AI and more.


Expand any category to fine-tune the checkboxes:


  • Read = Claude can view that data only.

  • Write = Claude can create, update or delete it.


Recommended security settings

Follow the principle of least privilege — grant only what you actually need. For most people, read-only is plenty for reporting and day-to-day questions. Specifically:


Users: Leave users.write disabled unless your integration specifically needs to create, update, or delete users. Most integrations only require users.readonly to retrieve user information. Enabling write access here grants permission to modify user accounts, so only turn it on when absolutely necessary.


Payments: Leave these Write permissions disabled unless your integration specifically requires them:


  • payments/orders.write — creates order fulfilments

  • payments/integration.write — creates and manages whitelabel payment integration providers

  • payments/coupons.write — creates, updates, and deletes coupons

  • payments/custom-provider.write — connects, updates, and removes custom payment providers


The corresponding Read permissions are sufficient for most integrations. Only enable these Write scopes if Claude genuinely needs to modify payment settings.

Voice AI: If you're not using Voice AI, disable the Voice AI write permissions. Voice AI features are usage-based, so granting unnecessary write access could allow AI tools to create resources that result in unintended usage or costs. The Read permissions are sufficient if you only need to view Voice AI information.


Once you've reviewed and configured the permissions, click Allow & Install to complete the integration.


💡 Tip: Start read-heavy. You can always reinstall later with more scopes if you need Claude to make changes.

You'll see a confirmation in Claude

After clicking Allow & Install, Claude displays a confirmation in the top-right corner: "Connected to Tekmatix." Once you see that notification, you're ready to go.


Step 10: Test it — ask Claude about your account

Back in Claude, start a new chat and ask something only Tekmatix would know. For example:


"Tell me how many contacts are in my Tekmatix account and how many workflows I have."


Claude queries Tekmatix live. In our demo, it found 6,100 contacts and 295 workflows (35 published, 260 draft) — and even flagged a batch of unused draft workflows as an easy cleanup candidate. That's the kind of proactive insight this connection unlocks.


The first time you ask, Claude may request approval for each tool action — just click Allow.


Verify the install inside Tekmatix

Want to double-check everything from the Tekmatix side?


Return to your Tekmatix dashboard and click App Marketplace in the left-hand navigation menu, then open the Installed Apps tab. You should see lc-mcp – Anthropic at the top of the list with today's install date.


This is also where you manage or uninstall the connection at any time — removing the app instantly cuts Claude's access.


Troubleshooting

Connector won't add? Double-check the URL: https://services.leadconnectorhq.com/mcp/anthropic/v2 — no spaces, no trailing text. Custom connectors also require a paid Claude plan.


Connect button loops or fails? Make sure you're logged in to the right Tekmatix account in the same browser, then click Connect again and complete the marketplace install.


Claude can't see certain data? The scope for that data type may be unticked. Reopen the app install in Tekmatix and enable the relevant Read scopes, or reconnect from Claude's Connectors page.


Want to revoke access? Uninstall the app from Tekmatix (App Marketplace → Installed Apps) at any time.


What to try next

Claude is now your Tekmatix co-pilot. A few prompts to get you started:


  • "Summarise my pipeline — how many opportunities are open right now?"

  • "Which of my workflows are drafts I can safely delete?"

  • "What's on my Tekmatix calendar this week?"

  • "Draft a social planner post about our new course."


The setup takes five minutes. The time it saves you? That compounds every single day.


Found this helpful? Share it with another Tekmatix user — and if you get stuck on any step, drop a comment below.


How to connect Claude AI to TekmatixConnect Claude AI to TekmatixClaude AI Tekmatix integrationTekmatix MCP integrationClaude MCP connectorClaude AI custom connectorTekmatix AI integrationConnect Claude to TekmatixClaude AI CRM integrationAnthropic MCPMCP integration guideTekmatix automationClaude AI setupTekmatix tutorialAI CRM integrationClaude business automationTekmatix workflowsClaude AI for CRMTekmatix AI assistantClaude connector setupClaude AI productivityTekmatix App MarketplaceLeadConnector MCPClaude AI integration guideTekmatix AI tools
Back to Blog

CRM

How to Connect Claude AI to Tekmatix Using the MCP Integration (Step-by-Step)

How to Connect Claude AI to Tekmatix Using the MCP Integration (Step-by-Step)

July 14, 20266 min read

How to Connect Claude with Tekmatix (Step-by-Step Guide with Screenshots)

Want your AI assistant to actually know your business? With the new Tekmatix MCP connector, you can link Claude directly to your Tekmatix account in about five minutes — and then ask it anything about your contacts, workflows, calendars, and more. Here's exactly how to do it, click by click.


Why connect Claude to Tekmatix?

If you use Tekmatix to run your business, your CRM already holds the answers to questions you ask yourself every day: How many contacts do I have? Which workflows are actually live? What's on my calendar this week?


Once connected, Claude can securely read (and, where you allow it, update) your Tekmatix data — contacts, conversations, calendars, workflows, funnels, payments, social planner posts and more. Instead of clicking through dashboards, you just ask in plain English and Claude pulls live answers straight from your account.

What you'll need

  • A Claude account — log in at claude.ai. Custom connectors are available on paid plans (Pro, Max, Team or Enterprise).

  • Your Tekmatix login — you'll approve the connection inside Tekmatix, so make sure you can sign in to the right account and location.

  • About 5 minutes — five clicks in Claude, one URL to paste, and one approval screen in Tekmatix.


The whole process has three phases: add the connector in Claude → authorize the app in Tekmatix → ask Claude anything.


Step 1: Open Claude in your browser

Go to claude.ai/new in any browser and log in with the Claude account you want to link to Tekmatix. You'll land on a fresh chat screen — no need to type anything yet.


💡 Tip: Bookmark claude.ai/new — it always opens a brand-new chat.

Step 2: Open Settings from your profile icon

Click your profile icon in the bottom-left corner of the screen, then click Settings in the menu that pops up.


💡 Tip: Keyboard shortcut Ctrl + , (Cmd + , on Mac) opens Settings instantly.

Step 3: Go to the Connectors section

The Settings panel opens on the General tab. In the left menu, under Customize, click Connectors. You'll see any connectors already linked to your account (Gmail, Google Drive, and so on).


Step 4: Click the Add button

In the top-right corner of the Connectors page, click Add. A small dropdown appears with two options: Browse connectors and Add custom connector.


Step 5: Choose "Add custom connector"

From the dropdown, click Add custom connector. Tekmatix isn't in the pre-built list yet, so we add it as a custom connector using its MCP address.


Step 6: Enter the Tekmatix connector details

A dialog called Add custom connector opens. Fill it in like this:


Then click the black Add button.


💡 Tip: Copy the URL exactly — one typo and the connector won't reach Tekmatix.

Step 7: Click Connect on your new connector

Tekmatix now appears in your connectors list. Open it and you'll see the message "You are not connected to Tekmatix yet." Click the Connect button.


A new browser tab opens on the LeadConnector Marketplace — Tekmatix's app store — to authorize the link.


Step 8: Install the "lc-mcp – Anthropic" app

You'll land on the lc-mcp – Anthropic app page (developer: leadconnector, App Type: Private). If asked, choose the correct location/account to connect, then click the blue Install button.


Take a second to read the privacy notice on this page: by connecting, this app shares your account data with the AI agents you link (Claude, etc.).


Step 9: Review permissions carefully — then Allow & Install

This is the most important screen of the whole setup. The install confirmation lists every permission by category — Contacts, Calendars, Payments, Social Planner, Workflows, Users, Voice AI and more.


Expand any category to fine-tune the checkboxes:


  • Read = Claude can view that data only.

  • Write = Claude can create, update or delete it.


Recommended security settings

Follow the principle of least privilege — grant only what you actually need. For most people, read-only is plenty for reporting and day-to-day questions. Specifically:


Users: Leave users.write disabled unless your integration specifically needs to create, update, or delete users. Most integrations only require users.readonly to retrieve user information. Enabling write access here grants permission to modify user accounts, so only turn it on when absolutely necessary.


Payments: Leave these Write permissions disabled unless your integration specifically requires them:


  • payments/orders.write — creates order fulfilments

  • payments/integration.write — creates and manages whitelabel payment integration providers

  • payments/coupons.write — creates, updates, and deletes coupons

  • payments/custom-provider.write — connects, updates, and removes custom payment providers


The corresponding Read permissions are sufficient for most integrations. Only enable these Write scopes if Claude genuinely needs to modify payment settings.

Voice AI: If you're not using Voice AI, disable the Voice AI write permissions. Voice AI features are usage-based, so granting unnecessary write access could allow AI tools to create resources that result in unintended usage or costs. The Read permissions are sufficient if you only need to view Voice AI information.


Once you've reviewed and configured the permissions, click Allow & Install to complete the integration.


💡 Tip: Start read-heavy. You can always reinstall later with more scopes if you need Claude to make changes.

You'll see a confirmation in Claude

After clicking Allow & Install, Claude displays a confirmation in the top-right corner: "Connected to Tekmatix." Once you see that notification, you're ready to go.


Step 10: Test it — ask Claude about your account

Back in Claude, start a new chat and ask something only Tekmatix would know. For example:


"Tell me how many contacts are in my Tekmatix account and how many workflows I have."


Claude queries Tekmatix live. In our demo, it found 6,100 contacts and 295 workflows (35 published, 260 draft) — and even flagged a batch of unused draft workflows as an easy cleanup candidate. That's the kind of proactive insight this connection unlocks.


The first time you ask, Claude may request approval for each tool action — just click Allow.


Verify the install inside Tekmatix

Want to double-check everything from the Tekmatix side?


Return to your Tekmatix dashboard and click App Marketplace in the left-hand navigation menu, then open the Installed Apps tab. You should see lc-mcp – Anthropic at the top of the list with today's install date.


This is also where you manage or uninstall the connection at any time — removing the app instantly cuts Claude's access.


Troubleshooting

Connector won't add? Double-check the URL: https://services.leadconnectorhq.com/mcp/anthropic/v2 — no spaces, no trailing text. Custom connectors also require a paid Claude plan.


Connect button loops or fails? Make sure you're logged in to the right Tekmatix account in the same browser, then click Connect again and complete the marketplace install.


Claude can't see certain data? The scope for that data type may be unticked. Reopen the app install in Tekmatix and enable the relevant Read scopes, or reconnect from Claude's Connectors page.


Want to revoke access? Uninstall the app from Tekmatix (App Marketplace → Installed Apps) at any time.


What to try next

Claude is now your Tekmatix co-pilot. A few prompts to get you started:


  • "Summarise my pipeline — how many opportunities are open right now?"

  • "Which of my workflows are drafts I can safely delete?"

  • "What's on my Tekmatix calendar this week?"

  • "Draft a social planner post about our new course."


The setup takes five minutes. The time it saves you? That compounds every single day.


Found this helpful? Share it with another Tekmatix user — and if you get stuck on any step, drop a comment below.


How to connect Claude AI to TekmatixConnect Claude AI to TekmatixClaude AI Tekmatix integrationTekmatix MCP integrationClaude MCP connectorClaude AI custom connectorTekmatix AI integrationConnect Claude to TekmatixClaude AI CRM integrationAnthropic MCPMCP integration guideTekmatix automationClaude AI setupTekmatix tutorialAI CRM integrationClaude business automationTekmatix workflowsClaude AI for CRMTekmatix AI assistantClaude connector setupClaude AI productivityTekmatix App MarketplaceLeadConnector MCPClaude AI integration guideTekmatix AI tools
Back to Blog
How to Connect Claude AI to Tekmatix Using the MCP Integration (Step-by-Step)

How to Connect Claude AI to Tekmatix Using the MCP Integration (Step-by-Step)

July 14, 20266 min read

How to Connect Claude with Tekmatix (Step-by-Step Guide with Screenshots)

Want your AI assistant to actually know your business? With the new Tekmatix MCP connector, you can link Claude directly to your Tekmatix account in about five minutes — and then ask it anything about your contacts, workflows, calendars, and more. Here's exactly how to do it, click by click.


Why connect Claude to Tekmatix?

If you use Tekmatix to run your business, your CRM already holds the answers to questions you ask yourself every day: How many contacts do I have? Which workflows are actually live? What's on my calendar this week?


Once connected, Claude can securely read (and, where you allow it, update) your Tekmatix data — contacts, conversations, calendars, workflows, funnels, payments, social planner posts and more. Instead of clicking through dashboards, you just ask in plain English and Claude pulls live answers straight from your account.

What you'll need

  • A Claude account — log in at claude.ai. Custom connectors are available on paid plans (Pro, Max, Team or Enterprise).

  • Your Tekmatix login — you'll approve the connection inside Tekmatix, so make sure you can sign in to the right account and location.

  • About 5 minutes — five clicks in Claude, one URL to paste, and one approval screen in Tekmatix.


The whole process has three phases: add the connector in Claude → authorize the app in Tekmatix → ask Claude anything.


Step 1: Open Claude in your browser

Go to claude.ai/new in any browser and log in with the Claude account you want to link to Tekmatix. You'll land on a fresh chat screen — no need to type anything yet.


💡 Tip: Bookmark claude.ai/new — it always opens a brand-new chat.

Step 2: Open Settings from your profile icon

Click your profile icon in the bottom-left corner of the screen, then click Settings in the menu that pops up.


💡 Tip: Keyboard shortcut Ctrl + , (Cmd + , on Mac) opens Settings instantly.

Step 3: Go to the Connectors section

The Settings panel opens on the General tab. In the left menu, under Customize, click Connectors. You'll see any connectors already linked to your account (Gmail, Google Drive, and so on).


Step 4: Click the Add button

In the top-right corner of the Connectors page, click Add. A small dropdown appears with two options: Browse connectors and Add custom connector.


Step 5: Choose "Add custom connector"

From the dropdown, click Add custom connector. Tekmatix isn't in the pre-built list yet, so we add it as a custom connector using its MCP address.


Step 6: Enter the Tekmatix connector details

A dialog called Add custom connector opens. Fill it in like this:


Then click the black Add button.


💡 Tip: Copy the URL exactly — one typo and the connector won't reach Tekmatix.

Step 7: Click Connect on your new connector

Tekmatix now appears in your connectors list. Open it and you'll see the message "You are not connected to Tekmatix yet." Click the Connect button.


A new browser tab opens on the LeadConnector Marketplace — Tekmatix's app store — to authorize the link.


Step 8: Install the "lc-mcp – Anthropic" app

You'll land on the lc-mcp – Anthropic app page (developer: leadconnector, App Type: Private). If asked, choose the correct location/account to connect, then click the blue Install button.


Take a second to read the privacy notice on this page: by connecting, this app shares your account data with the AI agents you link (Claude, etc.).


Step 9: Review permissions carefully — then Allow & Install

This is the most important screen of the whole setup. The install confirmation lists every permission by category — Contacts, Calendars, Payments, Social Planner, Workflows, Users, Voice AI and more.


Expand any category to fine-tune the checkboxes:


  • Read = Claude can view that data only.

  • Write = Claude can create, update or delete it.


Recommended security settings

Follow the principle of least privilege — grant only what you actually need. For most people, read-only is plenty for reporting and day-to-day questions. Specifically:


Users: Leave users.write disabled unless your integration specifically needs to create, update, or delete users. Most integrations only require users.readonly to retrieve user information. Enabling write access here grants permission to modify user accounts, so only turn it on when absolutely necessary.


Payments: Leave these Write permissions disabled unless your integration specifically requires them:


  • payments/orders.write — creates order fulfilments

  • payments/integration.write — creates and manages whitelabel payment integration providers

  • payments/coupons.write — creates, updates, and deletes coupons

  • payments/custom-provider.write — connects, updates, and removes custom payment providers


The corresponding Read permissions are sufficient for most integrations. Only enable these Write scopes if Claude genuinely needs to modify payment settings.

Voice AI: If you're not using Voice AI, disable the Voice AI write permissions. Voice AI features are usage-based, so granting unnecessary write access could allow AI tools to create resources that result in unintended usage or costs. The Read permissions are sufficient if you only need to view Voice AI information.


Once you've reviewed and configured the permissions, click Allow & Install to complete the integration.


💡 Tip: Start read-heavy. You can always reinstall later with more scopes if you need Claude to make changes.

You'll see a confirmation in Claude

After clicking Allow & Install, Claude displays a confirmation in the top-right corner: "Connected to Tekmatix." Once you see that notification, you're ready to go.


Step 10: Test it — ask Claude about your account

Back in Claude, start a new chat and ask something only Tekmatix would know. For example:


"Tell me how many contacts are in my Tekmatix account and how many workflows I have."


Claude queries Tekmatix live. In our demo, it found 6,100 contacts and 295 workflows (35 published, 260 draft) — and even flagged a batch of unused draft workflows as an easy cleanup candidate. That's the kind of proactive insight this connection unlocks.


The first time you ask, Claude may request approval for each tool action — just click Allow.


Verify the install inside Tekmatix

Want to double-check everything from the Tekmatix side?


Return to your Tekmatix dashboard and click App Marketplace in the left-hand navigation menu, then open the Installed Apps tab. You should see lc-mcp – Anthropic at the top of the list with today's install date.


This is also where you manage or uninstall the connection at any time — removing the app instantly cuts Claude's access.


Troubleshooting

Connector won't add? Double-check the URL: https://services.leadconnectorhq.com/mcp/anthropic/v2 — no spaces, no trailing text. Custom connectors also require a paid Claude plan.


Connect button loops or fails? Make sure you're logged in to the right Tekmatix account in the same browser, then click Connect again and complete the marketplace install.


Claude can't see certain data? The scope for that data type may be unticked. Reopen the app install in Tekmatix and enable the relevant Read scopes, or reconnect from Claude's Connectors page.


Want to revoke access? Uninstall the app from Tekmatix (App Marketplace → Installed Apps) at any time.


What to try next

Claude is now your Tekmatix co-pilot. A few prompts to get you started:


  • "Summarise my pipeline — how many opportunities are open right now?"

  • "Which of my workflows are drafts I can safely delete?"

  • "What's on my Tekmatix calendar this week?"

  • "Draft a social planner post about our new course."


The setup takes five minutes. The time it saves you? That compounds every single day.


Found this helpful? Share it with another Tekmatix user — and if you get stuck on any step, drop a comment below.


How to connect Claude AI to TekmatixConnect Claude AI to TekmatixClaude AI Tekmatix integrationTekmatix MCP integrationClaude MCP connectorClaude AI custom connectorTekmatix AI integrationConnect Claude to TekmatixClaude AI CRM integrationAnthropic MCPMCP integration guideTekmatix automationClaude AI setupTekmatix tutorialAI CRM integrationClaude business automationTekmatix workflowsClaude AI for CRMTekmatix AI assistantClaude connector setupClaude AI productivityTekmatix App MarketplaceLeadConnector MCPClaude AI integration guideTekmatix AI tools
Back to Blog

Join The TekMatix Newsletter

Get sent regular tech and business growth tips.

Web Design

How to Connect Claude AI to Tekmatix Using the MCP Integration (Step-by-Step)

How to Connect Claude AI to Tekmatix Using the MCP Integration (Step-by-Step)

July 14, 20266 min read

How to Connect Claude with Tekmatix (Step-by-Step Guide with Screenshots)

Want your AI assistant to actually know your business? With the new Tekmatix MCP connector, you can link Claude directly to your Tekmatix account in about five minutes — and then ask it anything about your contacts, workflows, calendars, and more. Here's exactly how to do it, click by click.


Why connect Claude to Tekmatix?

If you use Tekmatix to run your business, your CRM already holds the answers to questions you ask yourself every day: How many contacts do I have? Which workflows are actually live? What's on my calendar this week?


Once connected, Claude can securely read (and, where you allow it, update) your Tekmatix data — contacts, conversations, calendars, workflows, funnels, payments, social planner posts and more. Instead of clicking through dashboards, you just ask in plain English and Claude pulls live answers straight from your account.

What you'll need

  • A Claude account — log in at claude.ai. Custom connectors are available on paid plans (Pro, Max, Team or Enterprise).

  • Your Tekmatix login — you'll approve the connection inside Tekmatix, so make sure you can sign in to the right account and location.

  • About 5 minutes — five clicks in Claude, one URL to paste, and one approval screen in Tekmatix.


The whole process has three phases: add the connector in Claude → authorize the app in Tekmatix → ask Claude anything.


Step 1: Open Claude in your browser

Go to claude.ai/new in any browser and log in with the Claude account you want to link to Tekmatix. You'll land on a fresh chat screen — no need to type anything yet.


💡 Tip: Bookmark claude.ai/new — it always opens a brand-new chat.

Step 2: Open Settings from your profile icon

Click your profile icon in the bottom-left corner of the screen, then click Settings in the menu that pops up.


💡 Tip: Keyboard shortcut Ctrl + , (Cmd + , on Mac) opens Settings instantly.

Step 3: Go to the Connectors section

The Settings panel opens on the General tab. In the left menu, under Customize, click Connectors. You'll see any connectors already linked to your account (Gmail, Google Drive, and so on).


Step 4: Click the Add button

In the top-right corner of the Connectors page, click Add. A small dropdown appears with two options: Browse connectors and Add custom connector.


Step 5: Choose "Add custom connector"

From the dropdown, click Add custom connector. Tekmatix isn't in the pre-built list yet, so we add it as a custom connector using its MCP address.


Step 6: Enter the Tekmatix connector details

A dialog called Add custom connector opens. Fill it in like this:


Then click the black Add button.


💡 Tip: Copy the URL exactly — one typo and the connector won't reach Tekmatix.

Step 7: Click Connect on your new connector

Tekmatix now appears in your connectors list. Open it and you'll see the message "You are not connected to Tekmatix yet." Click the Connect button.


A new browser tab opens on the LeadConnector Marketplace — Tekmatix's app store — to authorize the link.


Step 8: Install the "lc-mcp – Anthropic" app

You'll land on the lc-mcp – Anthropic app page (developer: leadconnector, App Type: Private). If asked, choose the correct location/account to connect, then click the blue Install button.


Take a second to read the privacy notice on this page: by connecting, this app shares your account data with the AI agents you link (Claude, etc.).


Step 9: Review permissions carefully — then Allow & Install

This is the most important screen of the whole setup. The install confirmation lists every permission by category — Contacts, Calendars, Payments, Social Planner, Workflows, Users, Voice AI and more.


Expand any category to fine-tune the checkboxes:


  • Read = Claude can view that data only.

  • Write = Claude can create, update or delete it.


Recommended security settings

Follow the principle of least privilege — grant only what you actually need. For most people, read-only is plenty for reporting and day-to-day questions. Specifically:


Users: Leave users.write disabled unless your integration specifically needs to create, update, or delete users. Most integrations only require users.readonly to retrieve user information. Enabling write access here grants permission to modify user accounts, so only turn it on when absolutely necessary.


Payments: Leave these Write permissions disabled unless your integration specifically requires them:


  • payments/orders.write — creates order fulfilments

  • payments/integration.write — creates and manages whitelabel payment integration providers

  • payments/coupons.write — creates, updates, and deletes coupons

  • payments/custom-provider.write — connects, updates, and removes custom payment providers


The corresponding Read permissions are sufficient for most integrations. Only enable these Write scopes if Claude genuinely needs to modify payment settings.

Voice AI: If you're not using Voice AI, disable the Voice AI write permissions. Voice AI features are usage-based, so granting unnecessary write access could allow AI tools to create resources that result in unintended usage or costs. The Read permissions are sufficient if you only need to view Voice AI information.


Once you've reviewed and configured the permissions, click Allow & Install to complete the integration.


💡 Tip: Start read-heavy. You can always reinstall later with more scopes if you need Claude to make changes.

You'll see a confirmation in Claude

After clicking Allow & Install, Claude displays a confirmation in the top-right corner: "Connected to Tekmatix." Once you see that notification, you're ready to go.


Step 10: Test it — ask Claude about your account

Back in Claude, start a new chat and ask something only Tekmatix would know. For example:


"Tell me how many contacts are in my Tekmatix account and how many workflows I have."


Claude queries Tekmatix live. In our demo, it found 6,100 contacts and 295 workflows (35 published, 260 draft) — and even flagged a batch of unused draft workflows as an easy cleanup candidate. That's the kind of proactive insight this connection unlocks.


The first time you ask, Claude may request approval for each tool action — just click Allow.


Verify the install inside Tekmatix

Want to double-check everything from the Tekmatix side?


Return to your Tekmatix dashboard and click App Marketplace in the left-hand navigation menu, then open the Installed Apps tab. You should see lc-mcp – Anthropic at the top of the list with today's install date.


This is also where you manage or uninstall the connection at any time — removing the app instantly cuts Claude's access.


Troubleshooting

Connector won't add? Double-check the URL: https://services.leadconnectorhq.com/mcp/anthropic/v2 — no spaces, no trailing text. Custom connectors also require a paid Claude plan.


Connect button loops or fails? Make sure you're logged in to the right Tekmatix account in the same browser, then click Connect again and complete the marketplace install.


Claude can't see certain data? The scope for that data type may be unticked. Reopen the app install in Tekmatix and enable the relevant Read scopes, or reconnect from Claude's Connectors page.


Want to revoke access? Uninstall the app from Tekmatix (App Marketplace → Installed Apps) at any time.


What to try next

Claude is now your Tekmatix co-pilot. A few prompts to get you started:


  • "Summarise my pipeline — how many opportunities are open right now?"

  • "Which of my workflows are drafts I can safely delete?"

  • "What's on my Tekmatix calendar this week?"

  • "Draft a social planner post about our new course."


The setup takes five minutes. The time it saves you? That compounds every single day.


Found this helpful? Share it with another Tekmatix user — and if you get stuck on any step, drop a comment below.


How to connect Claude AI to TekmatixConnect Claude AI to TekmatixClaude AI Tekmatix integrationTekmatix MCP integrationClaude MCP connectorClaude AI custom connectorTekmatix AI integrationConnect Claude to TekmatixClaude AI CRM integrationAnthropic MCPMCP integration guideTekmatix automationClaude AI setupTekmatix tutorialAI CRM integrationClaude business automationTekmatix workflowsClaude AI for CRMTekmatix AI assistantClaude connector setupClaude AI productivityTekmatix App MarketplaceLeadConnector MCPClaude AI integration guideTekmatix AI tools
Back to Blog
How to Connect Claude AI to Tekmatix Using the MCP Integration (Step-by-Step)

How to Connect Claude AI to Tekmatix Using the MCP Integration (Step-by-Step)

July 14, 20266 min read

How to Connect Claude with Tekmatix (Step-by-Step Guide with Screenshots)

Want your AI assistant to actually know your business? With the new Tekmatix MCP connector, you can link Claude directly to your Tekmatix account in about five minutes — and then ask it anything about your contacts, workflows, calendars, and more. Here's exactly how to do it, click by click.


Why connect Claude to Tekmatix?

If you use Tekmatix to run your business, your CRM already holds the answers to questions you ask yourself every day: How many contacts do I have? Which workflows are actually live? What's on my calendar this week?


Once connected, Claude can securely read (and, where you allow it, update) your Tekmatix data — contacts, conversations, calendars, workflows, funnels, payments, social planner posts and more. Instead of clicking through dashboards, you just ask in plain English and Claude pulls live answers straight from your account.

What you'll need

  • A Claude account — log in at claude.ai. Custom connectors are available on paid plans (Pro, Max, Team or Enterprise).

  • Your Tekmatix login — you'll approve the connection inside Tekmatix, so make sure you can sign in to the right account and location.

  • About 5 minutes — five clicks in Claude, one URL to paste, and one approval screen in Tekmatix.


The whole process has three phases: add the connector in Claude → authorize the app in Tekmatix → ask Claude anything.


Step 1: Open Claude in your browser

Go to claude.ai/new in any browser and log in with the Claude account you want to link to Tekmatix. You'll land on a fresh chat screen — no need to type anything yet.


💡 Tip: Bookmark claude.ai/new — it always opens a brand-new chat.

Step 2: Open Settings from your profile icon

Click your profile icon in the bottom-left corner of the screen, then click Settings in the menu that pops up.


💡 Tip: Keyboard shortcut Ctrl + , (Cmd + , on Mac) opens Settings instantly.

Step 3: Go to the Connectors section

The Settings panel opens on the General tab. In the left menu, under Customize, click Connectors. You'll see any connectors already linked to your account (Gmail, Google Drive, and so on).


Step 4: Click the Add button

In the top-right corner of the Connectors page, click Add. A small dropdown appears with two options: Browse connectors and Add custom connector.


Step 5: Choose "Add custom connector"

From the dropdown, click Add custom connector. Tekmatix isn't in the pre-built list yet, so we add it as a custom connector using its MCP address.


Step 6: Enter the Tekmatix connector details

A dialog called Add custom connector opens. Fill it in like this:


Then click the black Add button.


💡 Tip: Copy the URL exactly — one typo and the connector won't reach Tekmatix.

Step 7: Click Connect on your new connector

Tekmatix now appears in your connectors list. Open it and you'll see the message "You are not connected to Tekmatix yet." Click the Connect button.


A new browser tab opens on the LeadConnector Marketplace — Tekmatix's app store — to authorize the link.


Step 8: Install the "lc-mcp – Anthropic" app

You'll land on the lc-mcp – Anthropic app page (developer: leadconnector, App Type: Private). If asked, choose the correct location/account to connect, then click the blue Install button.


Take a second to read the privacy notice on this page: by connecting, this app shares your account data with the AI agents you link (Claude, etc.).


Step 9: Review permissions carefully — then Allow & Install

This is the most important screen of the whole setup. The install confirmation lists every permission by category — Contacts, Calendars, Payments, Social Planner, Workflows, Users, Voice AI and more.


Expand any category to fine-tune the checkboxes:


  • Read = Claude can view that data only.

  • Write = Claude can create, update or delete it.


Recommended security settings

Follow the principle of least privilege — grant only what you actually need. For most people, read-only is plenty for reporting and day-to-day questions. Specifically:


Users: Leave users.write disabled unless your integration specifically needs to create, update, or delete users. Most integrations only require users.readonly to retrieve user information. Enabling write access here grants permission to modify user accounts, so only turn it on when absolutely necessary.


Payments: Leave these Write permissions disabled unless your integration specifically requires them:


  • payments/orders.write — creates order fulfilments

  • payments/integration.write — creates and manages whitelabel payment integration providers

  • payments/coupons.write — creates, updates, and deletes coupons

  • payments/custom-provider.write — connects, updates, and removes custom payment providers


The corresponding Read permissions are sufficient for most integrations. Only enable these Write scopes if Claude genuinely needs to modify payment settings.

Voice AI: If you're not using Voice AI, disable the Voice AI write permissions. Voice AI features are usage-based, so granting unnecessary write access could allow AI tools to create resources that result in unintended usage or costs. The Read permissions are sufficient if you only need to view Voice AI information.


Once you've reviewed and configured the permissions, click Allow & Install to complete the integration.


💡 Tip: Start read-heavy. You can always reinstall later with more scopes if you need Claude to make changes.

You'll see a confirmation in Claude

After clicking Allow & Install, Claude displays a confirmation in the top-right corner: "Connected to Tekmatix." Once you see that notification, you're ready to go.


Step 10: Test it — ask Claude about your account

Back in Claude, start a new chat and ask something only Tekmatix would know. For example:


"Tell me how many contacts are in my Tekmatix account and how many workflows I have."


Claude queries Tekmatix live. In our demo, it found 6,100 contacts and 295 workflows (35 published, 260 draft) — and even flagged a batch of unused draft workflows as an easy cleanup candidate. That's the kind of proactive insight this connection unlocks.


The first time you ask, Claude may request approval for each tool action — just click Allow.


Verify the install inside Tekmatix

Want to double-check everything from the Tekmatix side?


Return to your Tekmatix dashboard and click App Marketplace in the left-hand navigation menu, then open the Installed Apps tab. You should see lc-mcp – Anthropic at the top of the list with today's install date.


This is also where you manage or uninstall the connection at any time — removing the app instantly cuts Claude's access.


Troubleshooting

Connector won't add? Double-check the URL: https://services.leadconnectorhq.com/mcp/anthropic/v2 — no spaces, no trailing text. Custom connectors also require a paid Claude plan.


Connect button loops or fails? Make sure you're logged in to the right Tekmatix account in the same browser, then click Connect again and complete the marketplace install.


Claude can't see certain data? The scope for that data type may be unticked. Reopen the app install in Tekmatix and enable the relevant Read scopes, or reconnect from Claude's Connectors page.


Want to revoke access? Uninstall the app from Tekmatix (App Marketplace → Installed Apps) at any time.


What to try next

Claude is now your Tekmatix co-pilot. A few prompts to get you started:


  • "Summarise my pipeline — how many opportunities are open right now?"

  • "Which of my workflows are drafts I can safely delete?"

  • "What's on my Tekmatix calendar this week?"

  • "Draft a social planner post about our new course."


The setup takes five minutes. The time it saves you? That compounds every single day.


Found this helpful? Share it with another Tekmatix user — and if you get stuck on any step, drop a comment below.


How to connect Claude AI to TekmatixConnect Claude AI to TekmatixClaude AI Tekmatix integrationTekmatix MCP integrationClaude MCP connectorClaude AI custom connectorTekmatix AI integrationConnect Claude to TekmatixClaude AI CRM integrationAnthropic MCPMCP integration guideTekmatix automationClaude AI setupTekmatix tutorialAI CRM integrationClaude business automationTekmatix workflowsClaude AI for CRMTekmatix AI assistantClaude connector setupClaude AI productivityTekmatix App MarketplaceLeadConnector MCPClaude AI integration guideTekmatix AI tools
Back to Blog

© TekMatix 2026

© TekMatix 2025